If you ever managed your own email server, you know how painful it can be to do SMTP right. Aside from the configuration involved, many things can go wrong, such as your IP address being blacklisted, major email providers refusing your emails, etc.
One easy way to ensure that your server can send emails without much trouble and maintenance is to configure Postfix to route emails via Amazon SES (Simple Email Service.) In this post, we will see how to configure both of these systems.
SES Configuration#
The first step is to configure Amazon SES because we need to have the SMTP server address and credentials. We will also configure proper permissions to make sure that our SMTP user does not have more permissions than it needs.
Create Identities#
The first step is to add the domain that we will use to send emails as a new SES identity. Note that it is also possible to just add an email address identity, but in that case, Amazon doesn’t provide DKIM configuration, which is not good for email acceptance.
- Go to the SES Dashboard, and click on
Verified Identitiesthen onCreate Identity(be sure to check the region on the top right of the screen if that is important for you) - Select
Domainas anIdentity Typeand enter the domain you want to send emails from - In
Advanced DKIM SettingsselectEasy DKIM,RSA_2048_BITand disablePublish DNS records to Route53if your domain is not registered with Route53 - You should then see the same screen as the following screenshot. Edit your DNS records with the provided CNAMEs. Also, remember to add
include:amazonses.cominto your SPF configuration to enable better delivery (see my previous article about SPF and DKIM)
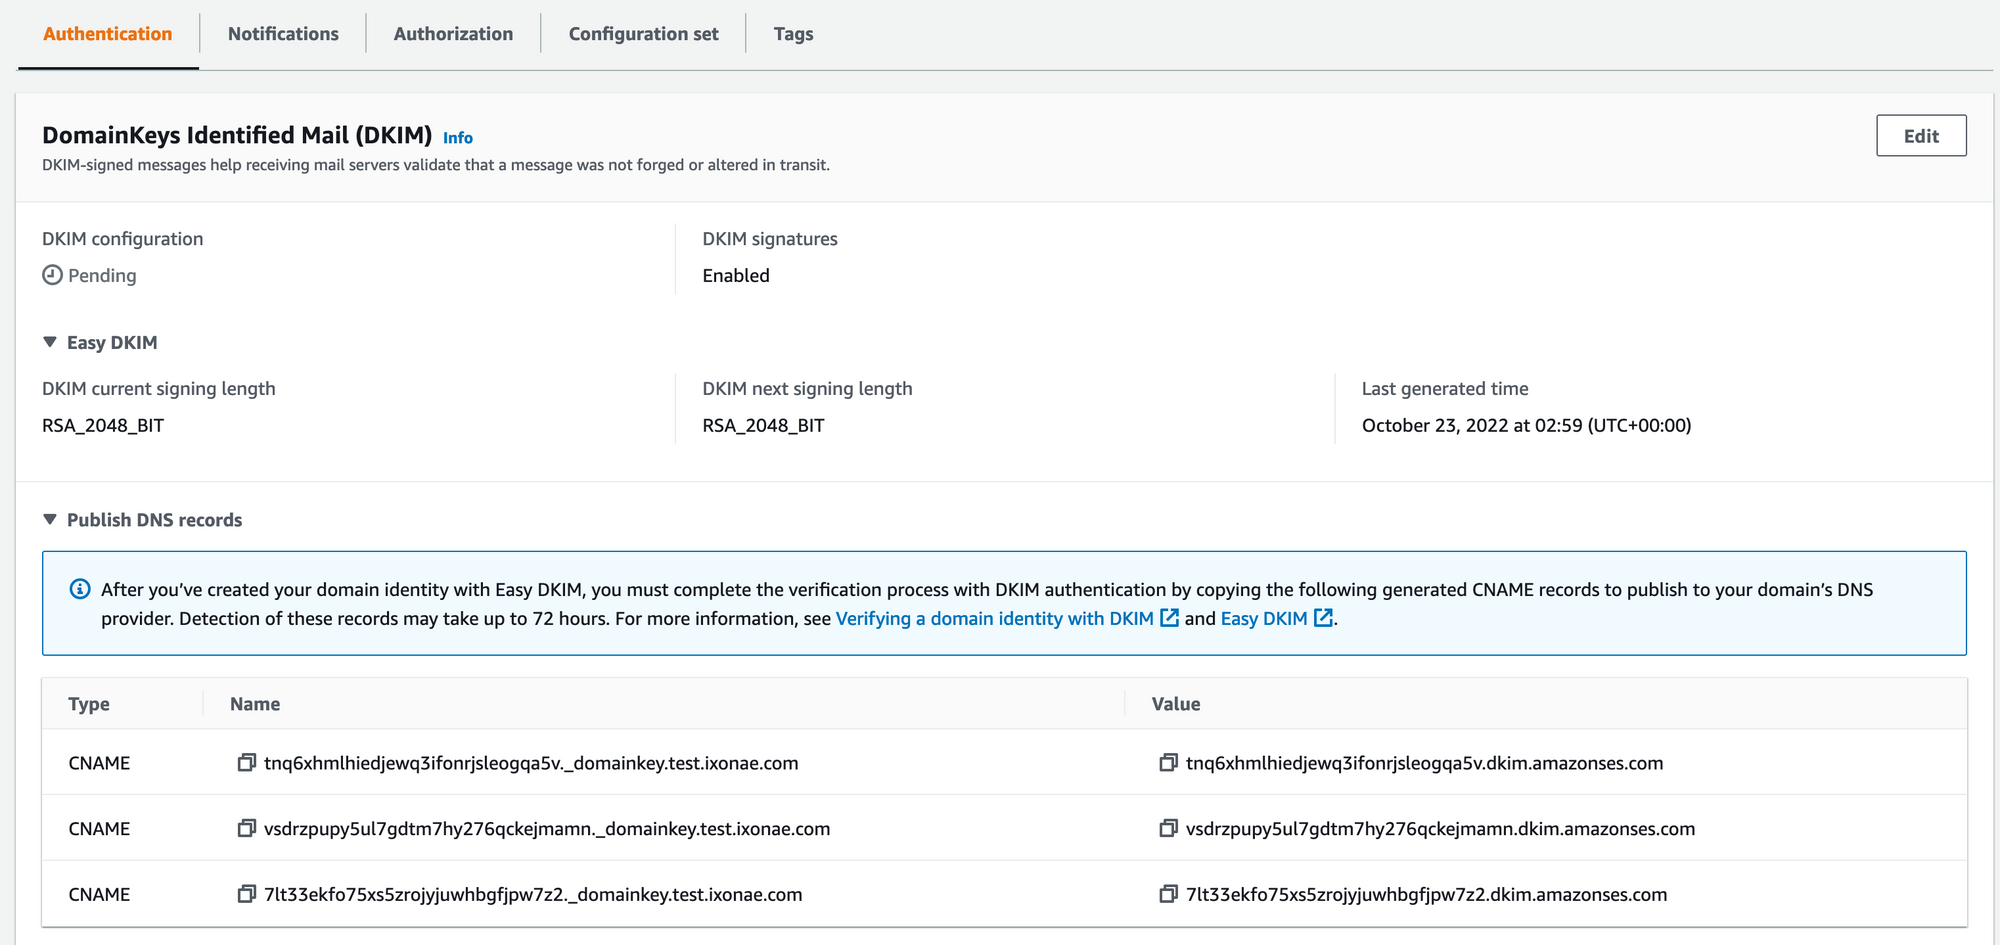
Once all the steps are completed, we should be able to send emails using the domain.
SMTP Credentials, IAM User, and Permissions#
Now, let’s create SMTP credentials. Go into Amazon SES -> SMTP Settings and note the SMTP endpoint that is provided. Then click on Create SMTP Credentials. You will be asked to choose a name for the IAM user that will be created. Pick something that will help you understand what the user is, like ses-noreply-test-donain. Then, save the SMTP credentials.
Next, we will make sure that our new IAM user can only send emails from our domain (by default, the IAM user is given the right to send emails using any identity in your account.) In the IAM user settings, you should see an inline policy as follows:
{
    "Version": "2012-10-17",
    "Statement": [
        {
            "Effect": "Allow",
            "Action": "ses:SendRawEmail",
            "Resource": "*"
        }
    ]
}
We will replace the * by the Amazon Resource Name (ARN) that you can find in the details of your domain in Amazon SES/Verified identities. It should look like that arn:aws:ses:us-east-1:123455:identity/test.domain.com.
Now, our IAM user only has permission to send emails for our newly added domain only. We can go further and only allow it to send emails using a specific address. In the Verified Identities panel of our domain (in SES), go to the Authorization tab and use the policy generator. From there, we can for example say that we want to deny SendRawEmail for our IAM user’s ARN if the ses:FromAddress is StringNotEquals to a specific address.
Note that rather than using the policy generator in the domain identity, you could very well just create an email identity, and give the ARN of this identity as allowed resource on your IAM user access policy.
Postfix Configuration#
Now that everything is ready on AWS’s side, we can SSH to our server and do the necessary configuration. Note that the following works for Debian-like systems. I also assume that you are not using Postfix for anything at the moment. If you do, the following changes might (or might not) break your configuration.
After making sure that sendmail is not installed on our system, let’s install all the needed packages.
sudo apt install postfix libsasl2-modules
Then, we will add the necessary configuration with the following commands (as root). You will need to replace email-smtp.us-east-1.amazonaws.com, SMTPUSERNAME, and SMTPPASSWORD with the values provided by SES in the previous part.
postconf -e "relayhost = [email-smtp.us-east-1.amazonaws.com]:587" \
"smtp_sasl_auth_enable = yes" \
"smtp_sasl_security_options = noanonymous" \
"smtp_sasl_password_maps = hash:/etc/postfix/sasl_passwd" \
"smtp_use_tls = yes" \
"smtp_tls_security_level = encrypt" \
"smtp_tls_note_starttls_offer = yes"


# We configure the credentials, compile the credentials database, and give correct permissions
echo "[email-smtp.us-east-1.amazonaws.com]:587 SMTPUSERNAME:SMTPPASSWORD" > /etc/postfix/sasl_passwd
postmap hash:/etc/postfix/sasl_passwd
chown root: /etc/postfix/sasl_passwd /etc/postfix/sasl_passwd.db
chmod 0600 /etc/postfix/sasl_passwd /etc/postfix/sasl_passwd.db

# So that Postfix can validate Amazon SES server's certificate
postconf -e 'smtp_tls_CAfile = /etc/ssl/certs/ca-certificates.crt'

systemctl restart postfix
Note that you might have the following issues during this setup:
/etc/postfix/main.cfdoes not exist ->cp /etc/postfix/main.cf.proto /etc/postfix/main.cfpostmap: fatal: bad string length 0 < 1: setgid_group =-> comment thesetgid_groupline in/etc/postfix/main.cf
After all of that is done, we should be able to test that things are properly sent:
echo "Test Message"| mail -s "Subject" -a "From:me@test.domain.tld" recipient@domain.tld
If the mail is not delivered, you can have a look at /var/log/mail.log. In the case where you have an issue with AAAA record not being found, you can add inet_protocols = ipv4 to the main.cf configuration file.
Multiple Relays, and Potential Local Mail Delivery Issues#
The following configuration allows you to route multiple domains through different relays.
If you followed the previous steps, it is also possible that the system is not be able to deliver local emails to your system (for example to root@myhostname.localdomain when a cron issue occurs.) The following configuration will also allow fixing that.
Let’s slightly edit our configurati0n to allow fixing that. In the main.cf configuration file, we will comment the line beginning with relayhost = and add the following two lines:
sender_dependent_relayhost_maps = hash:/etc/postfix/relayhost_map
smtp_sender_dependent_authentication = yes
Then, we will edit relayhost_map and add the following information (that we commented on main.cf.) This will allow Postfix to know which domains it should route through relays.
@my-domain.tld [email-smtp.us-east-1.amazonaws.com]:587
# Was not in the previous file, but we can do that
@my-domain2.tld [email-smtp.us-east-1.amazonaws.com]:587
We then run the following commands to update the database, and the problem should not be anymore.
# We update the database with the previous configuration
postmap hash:/etc/postfix/relayhost_map
# In case where the logs complain about /etc/aliases.db not being present
newaliases
# All done
systemctl restart postfix
Resources#
Credits#
- Cover photo by Daria Nepriakhina 🇺🇦 on Unsplash