Since its creation, this blog has been running with Ghost on a dedicated server. As I grew less and less impressed with it, I decided that it was time for a change, and to give a shot at Hugo, an open-source static site generator.
In this article, I’ll explain why I did the switch, and how I set up S3 and CloudFront on AWS (using Terraform) to host my blog.
Why the switch?#
There are quite a few things that were bothering me with Ghost. Some of them are:
- Lack of maintained themes and modules (e.g.: the AWS images hosting modules have had no commits for years; after some time, I had to stop using the theme I paid and installed when I started using Ghost because it wasn’t kept updated, causing everything to break, …)
- At some point, I started to use Casper, the official theme, with a few modifications, but that meant that I had to apply these modifications again every time I updated the theme
- No good media management system, and the editor is not so pleasant to use (especially when writing simple markdown, like imbricated lists)
- Pages rendering was slow
- From a system administration perspective, Ghost complains if its install directory doesn’t have its rights set to at
least
chmod 755, even though it runs under its own user, and the last5is not useful (also, I have a profound dislike for JS-ish technologies)
The coup de grâce was trying to migrate my blog to a new server. The export does not contain everything, and then, Ghost would not work properly after upgrading Node.js (which I could have fixed, but at this point, all these little things made me want to try something else). Don’t get me wrong, I still think Ghost is a pretty good platform, but I don’t believe that it is currently the best tool for what I want to do.
From there, I considered WordPress: easy to install and maintain, lots of modules and themes are available, … But I see WordPress-related CVEs in my RSS feed every other day. Also, this platform is not known for its speed.
In the past, I heard of Hugo, an open-source static site generator, and knowing that I wasn’t really taking advantage of the non-static features of Ghost anyway, I decided to give it a try. Compared to Ghost:
- It is faster (of course, since the site is static)
- It is easier to host (first because it is just a static website, and second because Hugo can deploy the site automatically to a variety of services such as AWS, Azur, or Cloudflare), and it is less expensive
- It virtually needs no maintenance (no need to worry about updating a server regularly, easier to backup, …)
- The website and theme are easier to customize (although there isn’t much more choice than for Ghost when it comes to themes)
- Of course, I lose some convenience due to the site becoming a static one (e.g. if I decide that I want to grant readers the ability to add comments, I will need to use Disqus or something)
AWS Setup#
As I mentioned before, my Hugo blog is hosted on AWS, using s3 and CloudFront. All is configured using Terraform, and pushed thanks to Hugo’s integrated deployment capabilities. Let’s go through the steps I took to put my blog online.
AWS Certificate Manager#
The fist step was to create a certificate for ixonae.com and www.ixonae.com using ACM. I used the basic
DNS validation method and RSA 2048. Then, I added the appropriate CNAME entries to my DNS settings to prove my
ownership. It would have been possible to do it from Terraform as well, but since my DNS provider is not AWS, I
found it easier to generate the certificate by hand (due to the validation step).
Note that to be usable with CloudFormation, the certificate must be created in the us-east-1 zone.
S3 and CloudFront setup via Terraform#
The configuration is more than 100 lines long, so I won’t paste it here, but you can see it on GitHub. What is does it the following:
- Creates a bucket named
example-websitethat- Keeps the file changes history for 30 days, then it will only keep the most recent change
- Has its access defined as non-public, and its content can only be requested through CloudFront
- Uses a Bucket encryption key (“the bucket key reduces encryption costs by lowering calls to AWS KMS”)
- Creates a CloudFront distribution that
- Uses the previously created s3 bucket as its source of data
- Allows IP v6
- Sets the cache policy as
Managed-CachingOptimized(AWS recommended) - Uses TLSv1.2_2021
- Supports HTTP/2 (HTTP/1 is by default, and HTTP/3 can be added)
- Sets up the SSL certificate thanks to its hardcoded ARN ID, and adds alternate domain names
- Compresses objects automatically
- Redirects HTTP to HTTPS
- Allows GET and HEAD HTTP methods
- Sets a CloudFront function to be applied to
viewer requests (by default clients will access URLs such as
ixonae.com/blog/but we want CloudFront to accessixonae.com/blog/index.html. This won’t be shown to the client that will only use the “clean” URL)
- Creates an S3 bucket
example-website-logs, and configure CloudFront to write logs into thelogsdirectory of this bucket - Creates and applies an S3 policy to allow the CloudFront distribution to access the
example-websiteS3 bucket
Note that if you want to re-use my configuration, you will have to change the following:
- The bucket name must be unique, and it is very likely that somebody is already using
example-website - You must choose a region (currently set as
xx-xxxx-xx) - You must set
acm_certificate_arnwith the ARN of the ACM certificate created in the previous step, and replacealiaseswith the appropriate values
After applying this Terraform, all that is left is to configure your DNS records with a CNAME entry to point to the
Distribution domain name generated by CloudFront (e.g. abcd.cloudfront.net).
Hugo Configuration#
Hugo’s configuration is pretty trivial. You just need your configuration file to contain the following (although there are many more optimization options available)
[deployment.targets]
name = "mydeployment"
url = "s3://example-website?region=xx-xxxx-x"
cloudFrontDistributionID = "xxxxxxxx"
And the deployment can be done with the following commands (given that you already have a ~/.aws/credentials file
with the proper credentials)
hugo # To compile the website
hugo deploy # To upload everything and invalidate the CloudFront cache
Conclusion and future work#
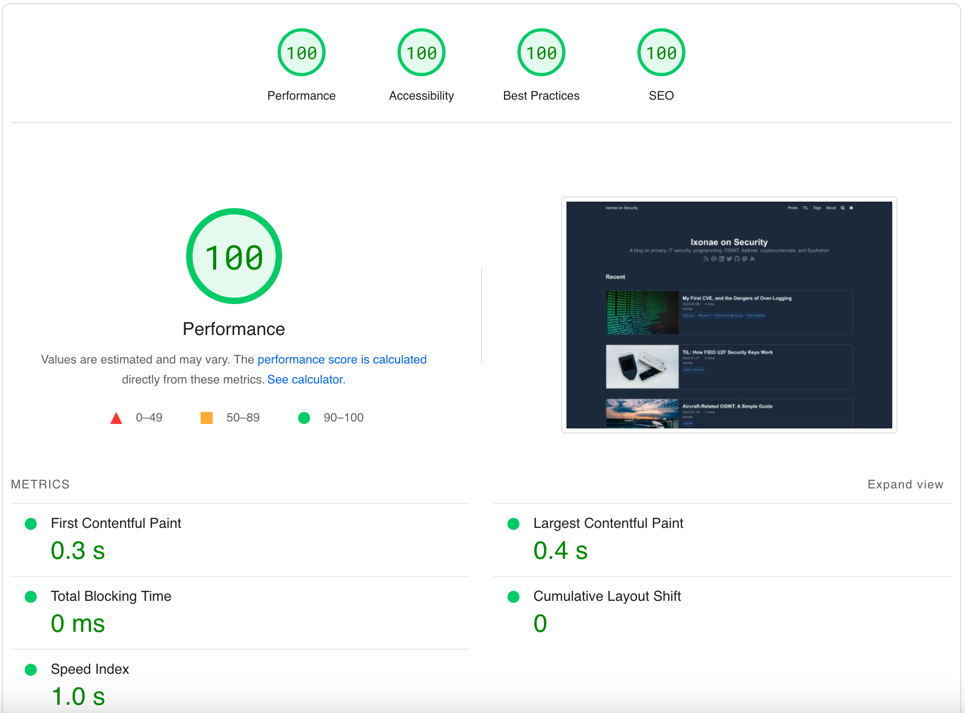
My blog is now live using Hugo and AWS, and I don’t need to bother anymore with server maintenance or to worry about being able to swiftly put my website back online in case of outrage. Also, I now have a score of 100/100 when testing my website with PageSpeed Insights.
Next, there are some workflow improvements that I plan to make:
- When something is pushed to the master branch of my git repository, trigger a deployment to the production AWS stack
- Add a cron job to my CI/CD pipeline so that Hugo regularly tries to compile and deploy the website (so that
articles with a
datein the future are automatically pushed when relevant) - When the same is done to the dev branch, trigger a deployment to a test environment requiring authentication
- Small AWS configuration improvements (better logs monitoring and storage, cross-region replication, …)
Credits#
- Cover photo by Glenn Carstens-Peters on Unsplash