Self-hosting is great, but there is a problem: the more you install new services, the more attack surface you create on your server, and the more careful you need to be about updates and such if you don’t want to risk being hacked.
In this article, we will discuss one way to bring some more security to your self-hosted services and be less stressed about needed quick updates by not exposing them to the Internet but still allowing easy access. To achieve this, we will configure a WireGuard server, see how to connect to it, restrict non-connected users from accessing your services, and ensure that all machines in your local network can access services hosted on your server using pfSense.
Note that I will be assuming that your VPN server and the services you want to protect are on the same server. If that is not the case, you would have to tweak the firewall configuration a little bit.
Install the WireGuard Server#
The first step is to install the WireGuard server and generate a pair of public/private keys.
sudo apt-get install wireguard
cd /etc/wireguard
umask 077
wg genkey > wg0.key
wg pubkey < wg0.key > wg0.pub
We can then create a /etc/wireguard/wg0.conf file with the following configuration. We use the Address field to define that the IPs of the clients connected to the VPN will be between 10.90.0.2 and 10.90.0.254, but you can use what you want (just be careful not to use a range already in use.)
[Interface]
PostUp = wg set %i private-key /etc/wireguard/%i.key
Address = 10.90.0.1/24
ListenPort = 51822
When this is done, we add a systemd service, start the server, and check that it properly runs:
sudo systemctl enable wg-quick@wg0.service
sudo systemctl start wg-quick@wg0.service
sudo systemctl status wg-quick@wg0.service
In our case, we don’t want to use the VPN to access the Internet, so we just need to open the WireGuard port so that clients can connect to the server
sudo iptables -t filter -A INPUT -p udp --dport 51822 -j ACCEPT
If you want to be able to use the VPN to connect to the Internet, the following commands should work (eth0 should be replaced with the name of the Interface you use to connect to the Internet)
sudo sysctl -w net.ipv4.ip_forward=1
sudo iptables -t nat -A POSTROUTING -s 10.90.0.0/24 -o eth0 -j MASQUERADE
Configure a Client#
Client-Side Configuration#
Now, we want to test if we can properly connect to our server. With the WireGuard client, clicking on Add Empty Tunnel... should give you the following screen (the client will automatically generate a pair of keys for you.)
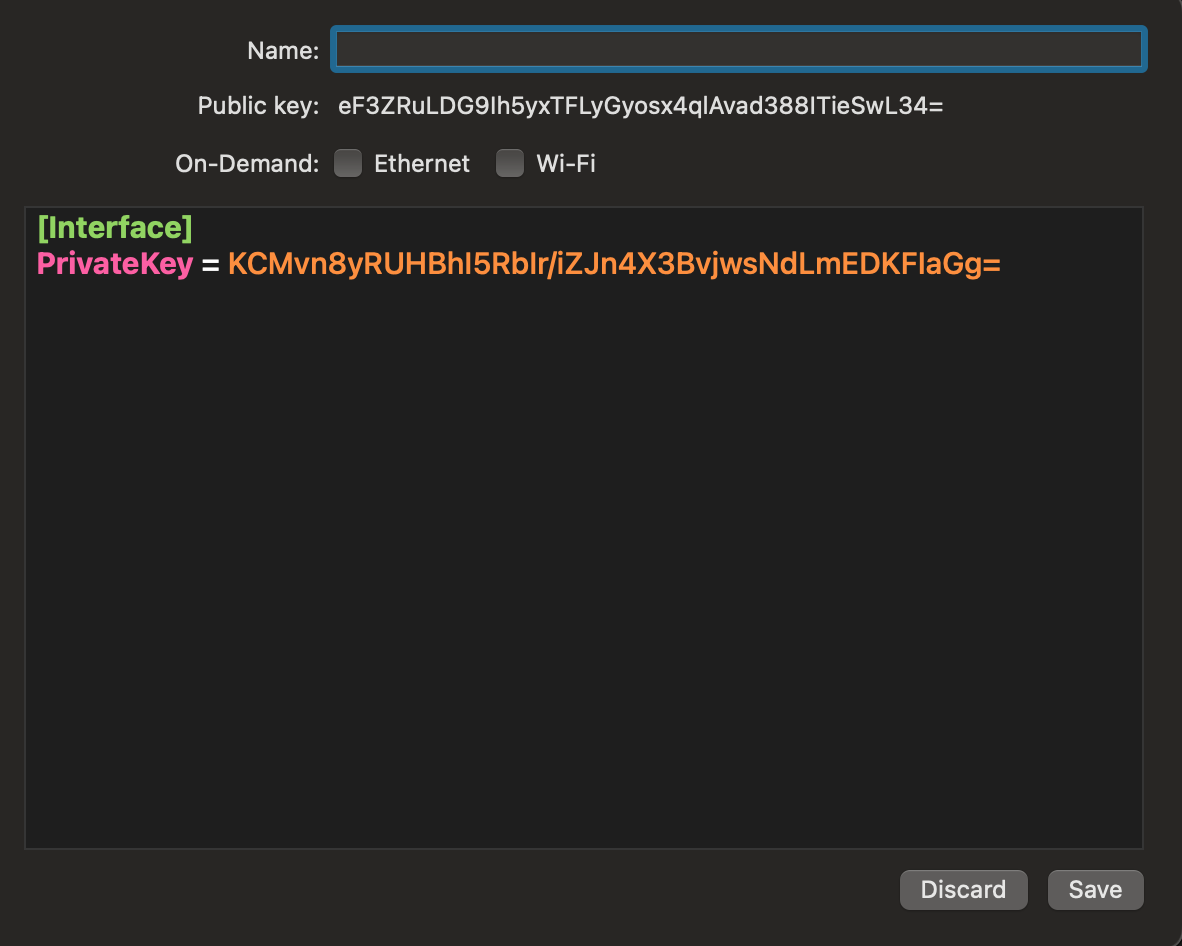
We will change the configuration so that it looks like the following (replace A.B.C.D by your server’s IP)
[Interface]
PrivateKey = KCMvn8yRUHBhI5RbIr/iZJn4X3BvjwsNdLmEDKFIaGg=
Address = 10.90.0.2/32

[Peer]
PublicKey = [Paste the content of the server's /etc/wireguard/wg0.pub]
AllowedIPs = 10.90.0.0/24
Endpoint = A.B.C.D:51822
PersistentKeepalive = 25
Address will be your client IP in the VPN network. The AllowedIPs option allows us to say which IP addresses should be reached through the VPN. Here, we just want to access the VPN network, but if we wanted to route all through the VPN we would have to write 0.0.0.0/0.
Save the configuration, but the connection will not work yet, as we need to allow our client in the server’s configuration.
Server-Side Configuration#
The server-side configuration is pretty light. We just need to edit our /etc/wireguard/wg0.conf file, and add the following lines:
[Peer]
PublicKey = eF3ZRuLDG9Ih5yxTFLyGyosx4qlAvad388ITieSwL34=
AllowedIPs = 10.90.0.2/32
AllowedIPs is the address we want to assign to the client (here 10.90.0.2) and the public key is the one that the Wireguard client generated for us.
Once the configuration is saved, we need to reboot the server, and we should then be able to connect to it.
# Server side
sudo systemctl restart wg-quick@wg0.service

# Client side to test the connection
ping 10.90.0.1
curl http://10.90.0.1 # If you have a web server running
If you don’t want to reboot the WireGuard server, you have the option to use the wg command. Note that this will not save anything, so you still need to edit the configuration file. Otherwise, the configuration will be lost the next time you reboot the server.
# To add a client
wg set wg0 peer "eF3ZRuLDG9Ih5yxTFLyGyosx4qlAvad388ITieSwL34=" allowed-ips 10.90.0.2/32

# To remove a client
wg set wg0 peer "eF3ZRuLDG9Ih5yxTFLyGyosx4qlAvad388ITieSwL34=" remove
Take Advantage of WireGuard#
Now that we have a working server, we can make it so that services are not accessible from the outside world.
The most secure way to manage things would be to only open the INPUT ports for SSH and WireGuard since this leaves very little attack surface. We can then access our services at the IP 10.90.0.1.
But let’s say that we want to share something with a third party without requiring them to have VPN access. For this kind of scenario, I expose my Apache instance to the Internet, but I use the following Apache configuration in my Virtual Host. It requires one to either be connected through the VPN or log in with a user in the group mygroup.
  <Location />
    Require all denied
    AuthType Basic
    AuthName "Password Required"

    AuthUserFile "/path/to/htpasswd"
    AuthGroupFile "/path/to/htgroup"

    <RequireAny>
      Require ip 10.90.0.0/24
      Require group mygroup
    </RequireAny>

  </Location>
This has the advantage of not bothering me with BasicAuth when I’m using the server but also reduces the risk of malicious actors exploiting something since it is behind a password.
PfSense Configuration#
All of that is great, but configuring WireGuard on all of our devices is annoying. What if we could make it so that all the devices in our home network can access the services that you are hosting on your server?
If you have PfSense, you can actually do that by creating a WireGuard tunnel and doing some routing configuration. (You might also be interested in this article on pfSense setup.)
Configure a WireGuard Tunnel#
First, we will go to System/Package Manager/Available Packages and install WireGuard.
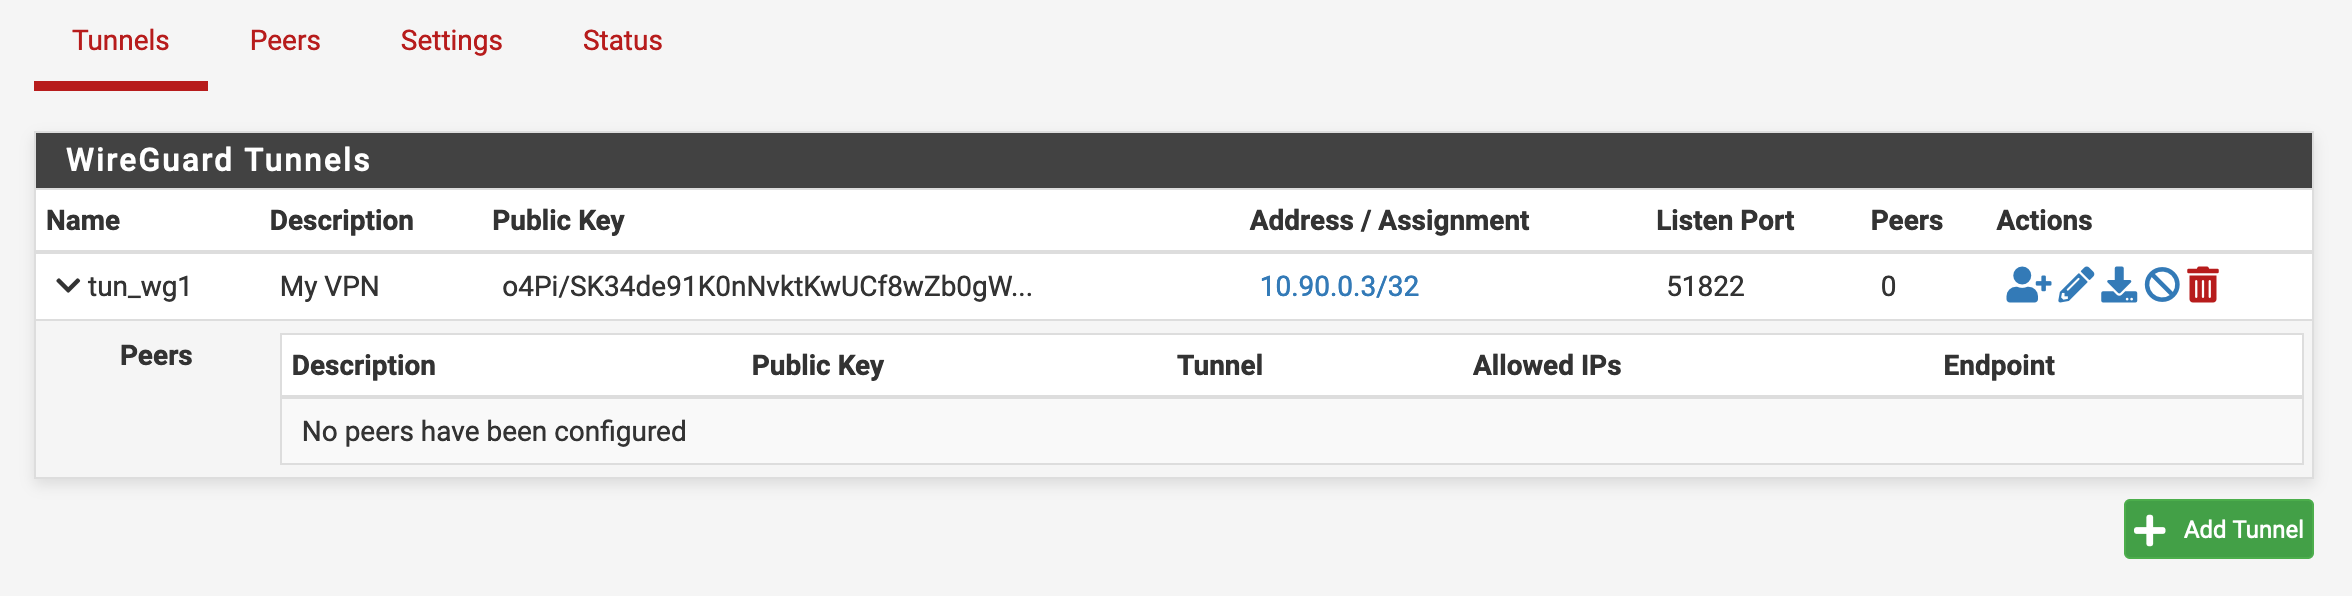
Then, we will configure the connection in VPN/WireGuard/Tunnels. Click on Add Tunnel, put the Interface address as 10.90.0.3/32 and generate a pair of keys. Save the interface, and log into your server to add a client with this public key and IP address (see previous part Configure a Client/Server-Side Configuration.)

After we created the interface, we should see this screen in the list of tunnels.
We will then click on the Add Peer icon on the Actions column, and configure the Peer as follows.
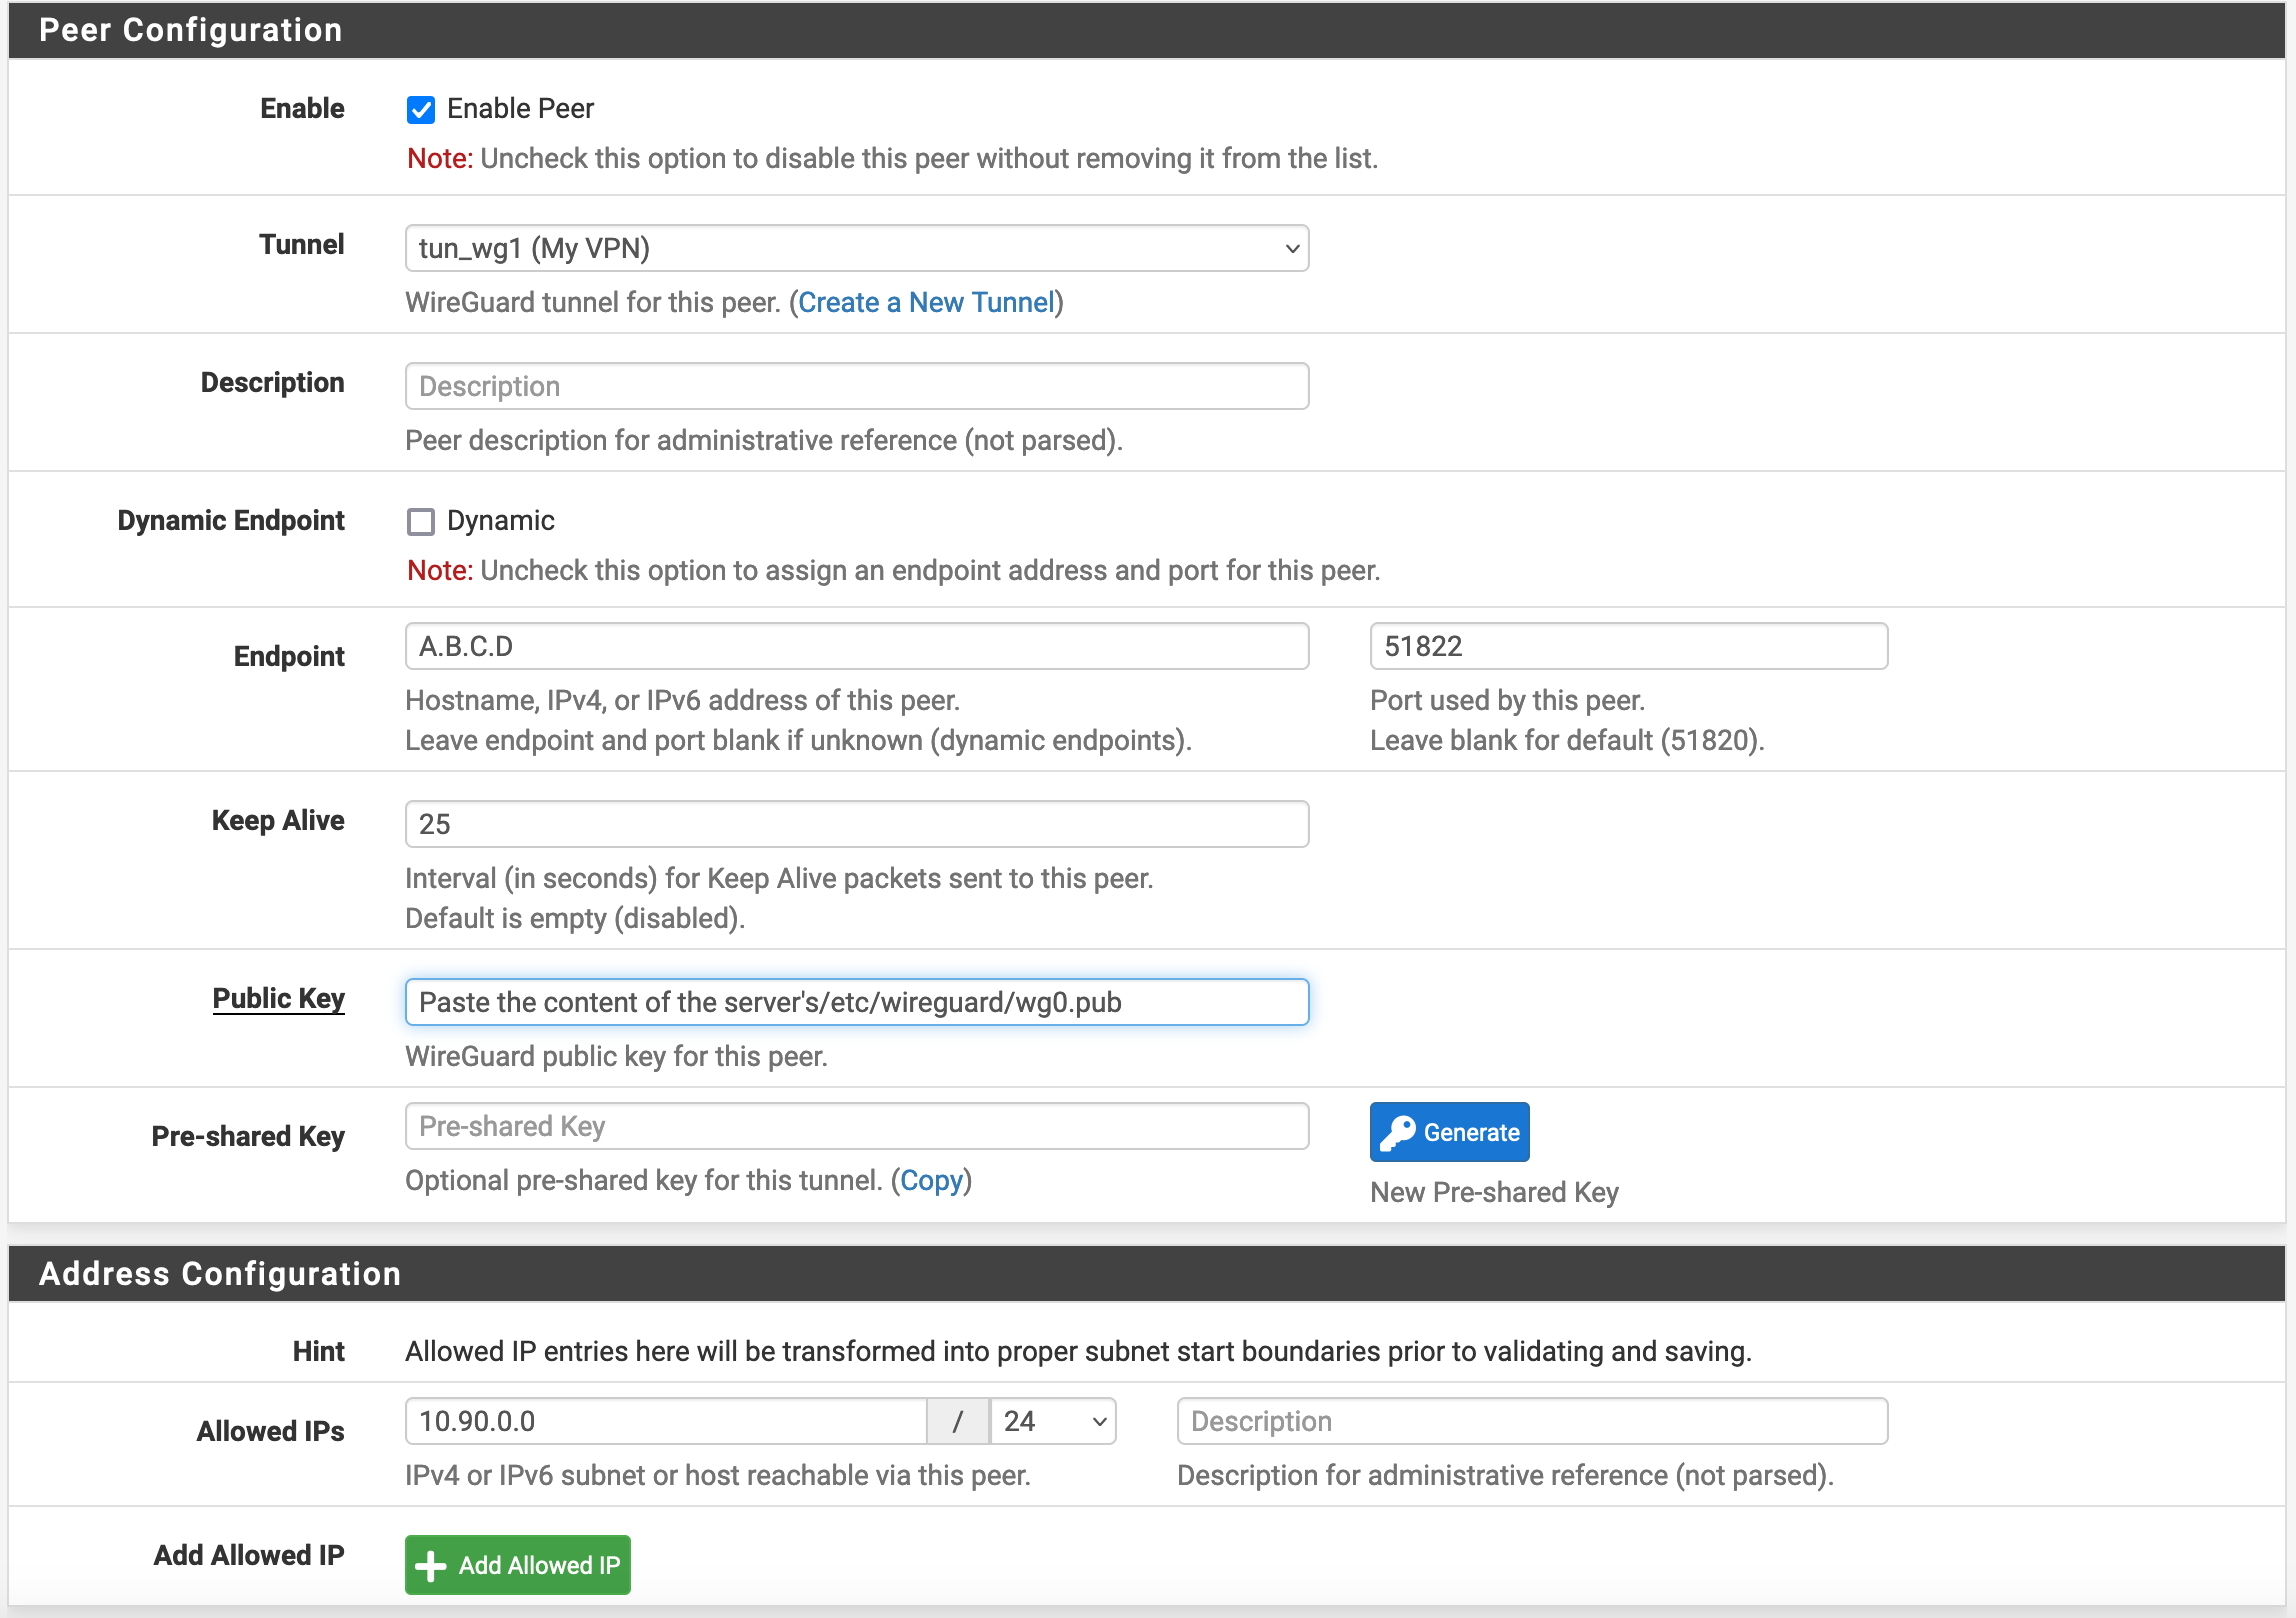
Save and apply the changes. Also, don’t forget to go to the Settings menu and enable Wireguard. When all of this is done, we should be able to confirm that the tunnel is running in the Status / Wireguard menu.
Route the Relevant Traffic Through Wireguard#
Now that we have a working tunnel, we want to redirect all of the traffic to 10.90.0.0/24.
We will create an Interface named WG1 in Interfaces / Interface Assignments and configure it as follows:

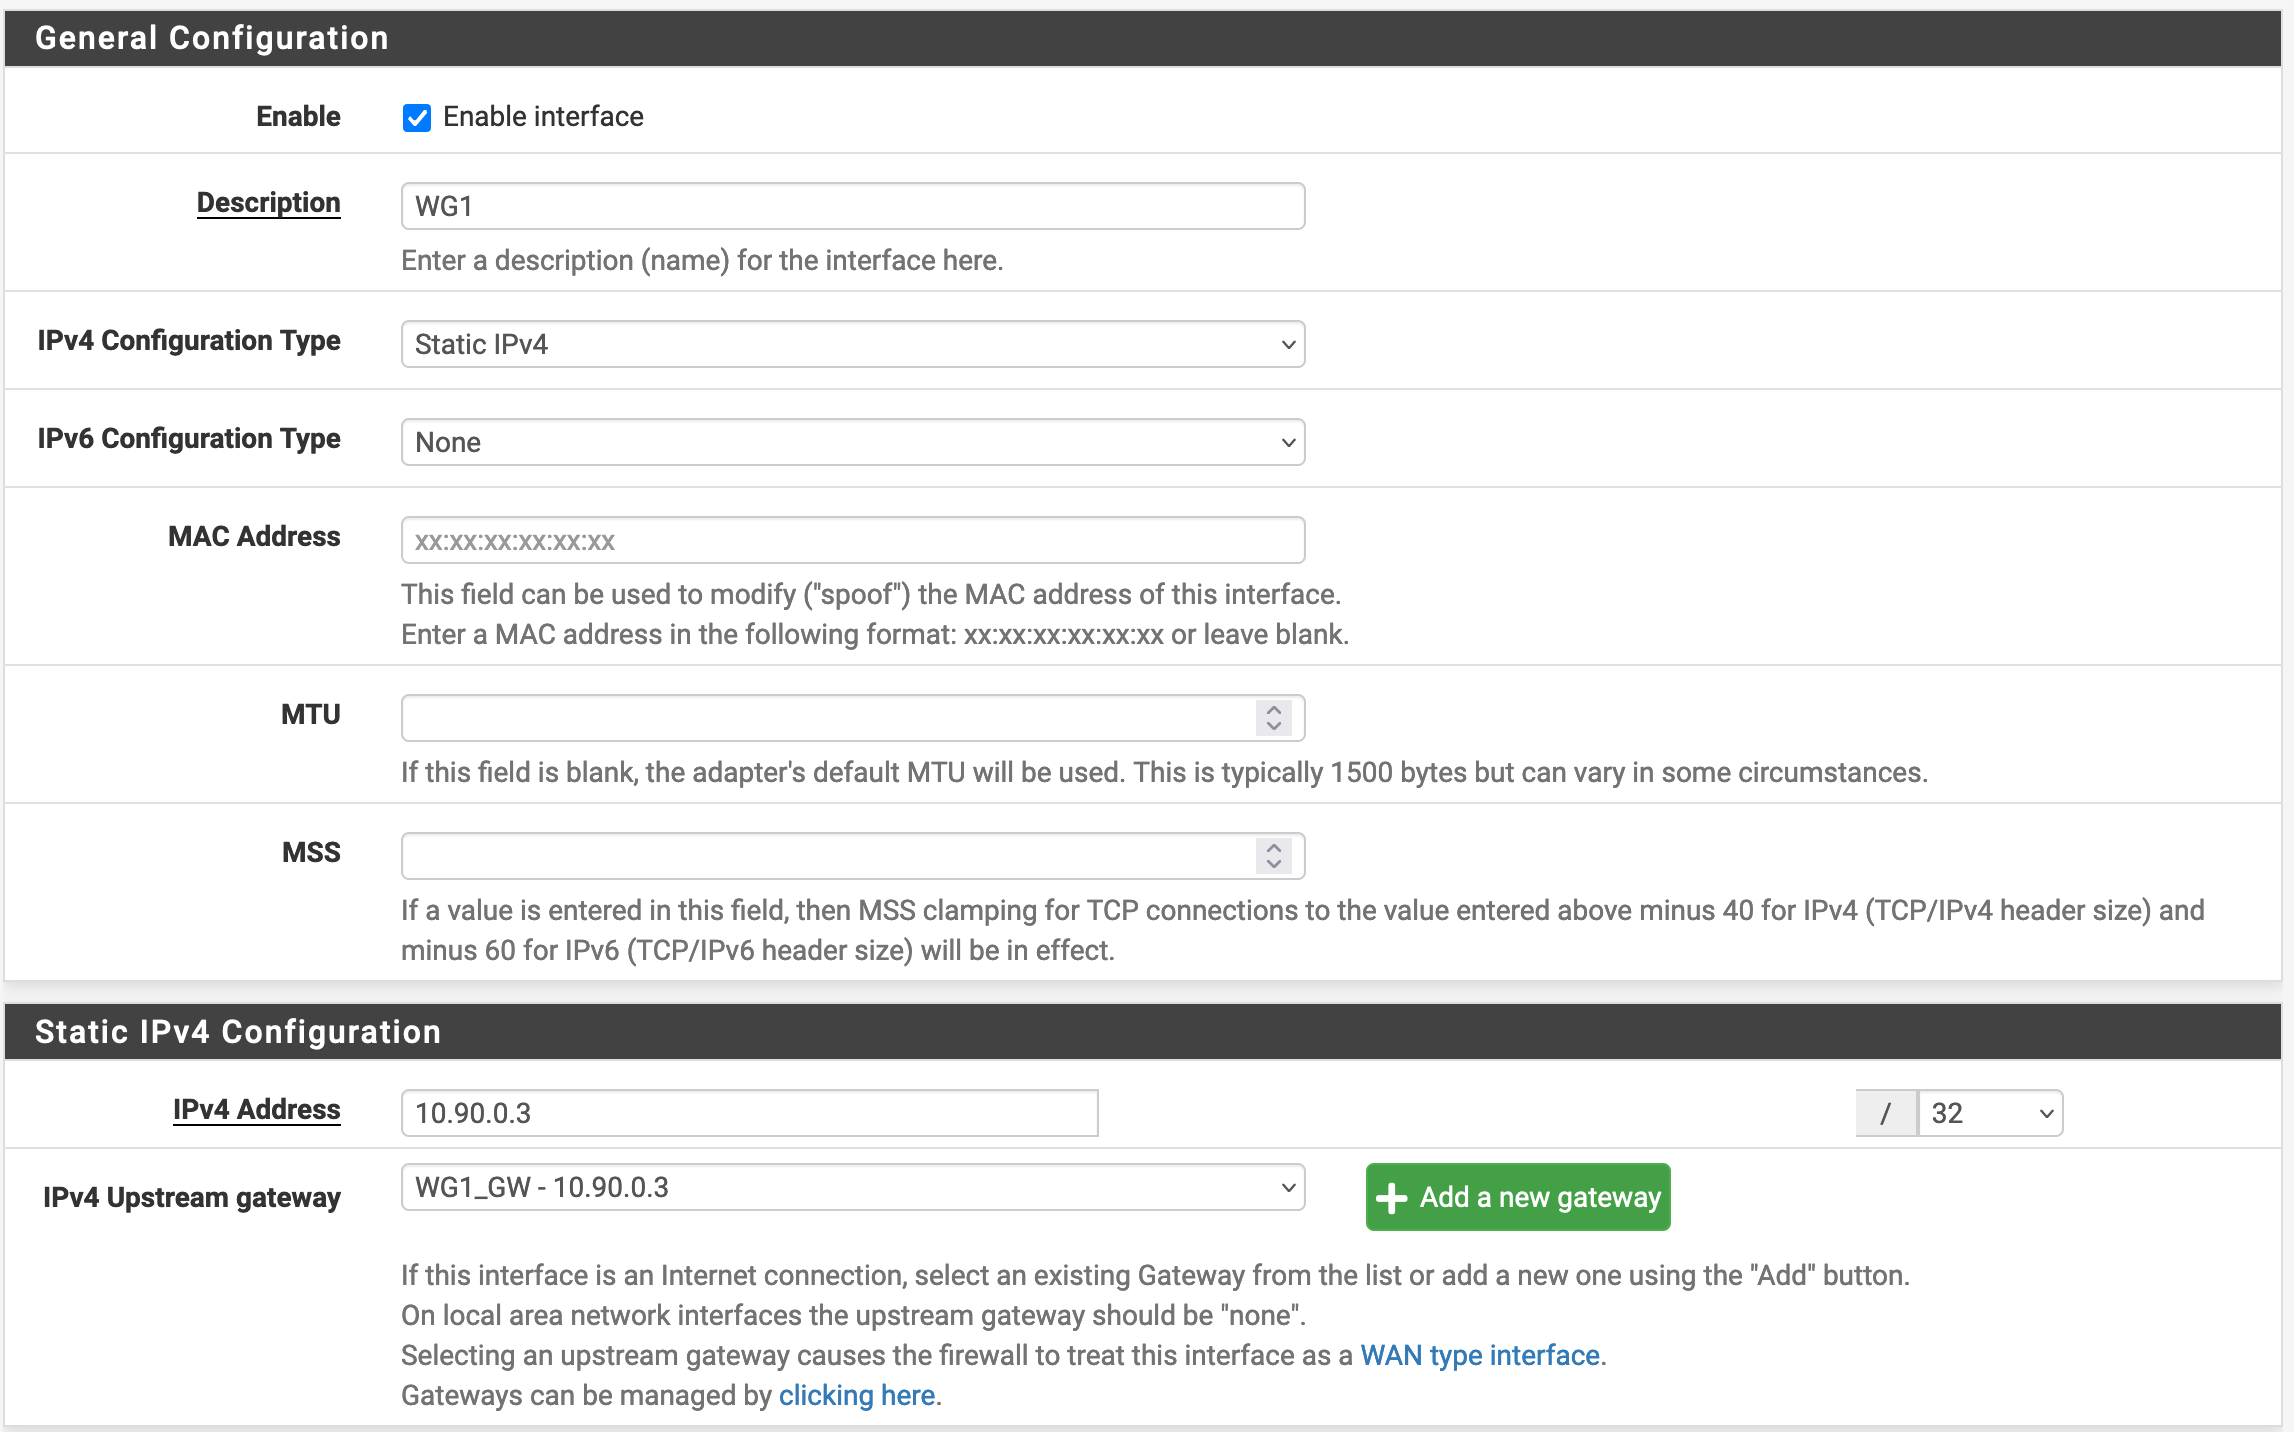
Note that we need to create the Gateway by Clicking on Add a new gateway and giving it the IP 10.90.0.3. When the interface change is saved, we can go to System / Routing / Gateways and confirm that it was properly created.

We will then create an Outbound NAT rule in Firewall / NAT / Outbound. We need to make sure that this rule is before the ones for the Interfaces reaching the Internet.

Finally, in Firewall / Rules / LAN, we will add the following rule. As for the NAT, we need to make sure that it is before your rules redirecting traffic to the WAN and VPN Gateways.

DNS Resolver#
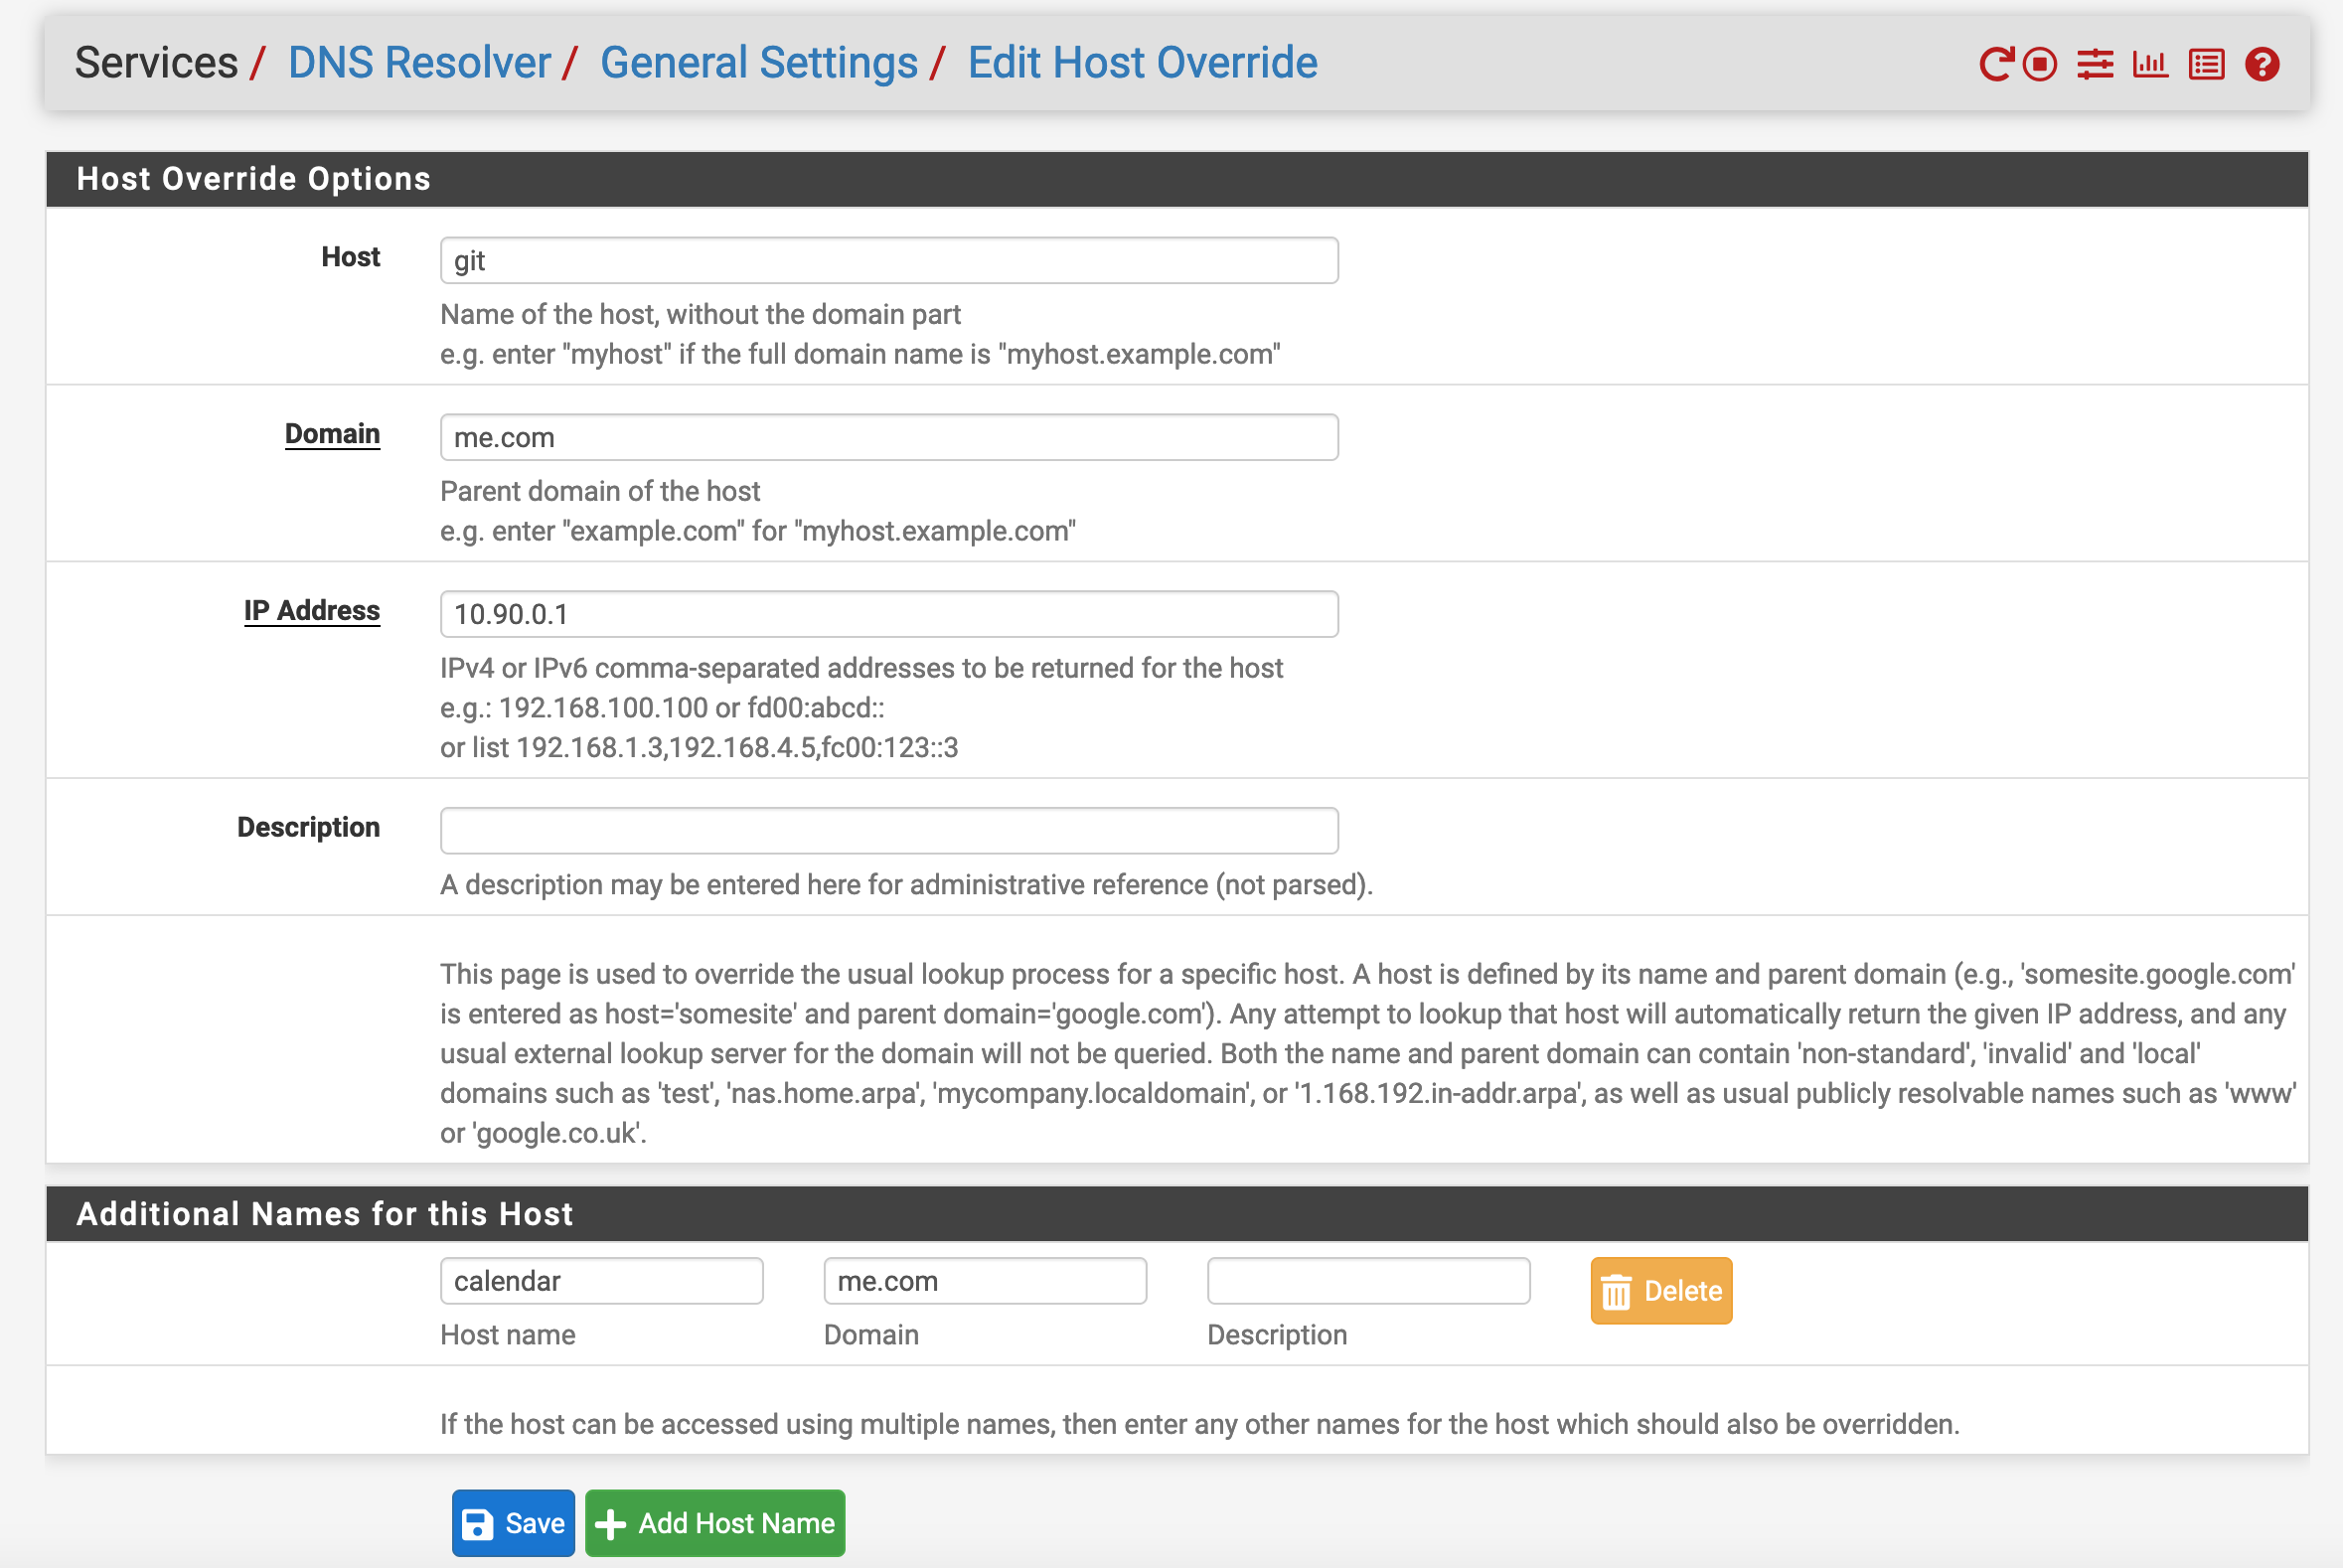
If you are using something similar to the Apache configuration I linked previously, you will have a small issue: your DNS entry will be pointing to the server’s IP address rather than the Internal VPN one. One way to fix this is to PfSense’s DNS resolver. For example, if you want git.me.com and calendar.me.com to be reached through the VPN network, you can add a Host Override and configure it as follows.
Sources#
- Using the VPN as the default gateway (Ubuntu doc)
- Wireguard Client Addition without restart (ServerFault)
Credits#
- Cover image from Peter Albanese on Unsplash