A couple of weeks ago, I posted an article explaining how to convert an unused Raspberry Pi into a WiFi router that makes all your traffic go through a VPN with OpenWRT. In today’s article, we will jump to the next level and see how you can manage your home network if you want more control, features, and performances.
For this purpose, we will use pfSense, a FreeBSD-based firewall/router distribution maintained by NetGate, and do the following:
- Create a basic working setup of pfSense
- Re-route your traffic (or at least some of it) through a VPN
- Configure a local DNS resolver
- Install pfBlockerNG, the PiHole equivalent to improve your privacy (ads and trackers will be blocked at the DNS level)
- Set up some basic monitoring with Snort
Note that I’m using a Protectli FW4B (4GB of RAM, 32 GB hard drive - so far, it seems to be more than enough) and a basic WiFi router that is running in access point mode. The configuration could be further improved by using an access point supporting VLANs (particularly if you want to isolate things such as Amazon devices.) I’m using the latest pfSense version (2.6.0) at the time this article is written.
Ah, and just a word on VPNs, because we hear a lot of things about them these days… VPNs are not any kind of magic that will make you secure or whatever. What they mostly do is:
- Rather than your ISP, another company gets to see your Internet traffic. This is good if you trust your VPN provider more than your ISP (also, it can be harder for your VPN provider to link your traffic to a real-world identity)
- Multiple people will use the same IP as you, so it will be harder for websites and such to track you. It also obfuscates your real physical location (which can be known to a certain extent with your real IP address)
Basic Setup#
The base setup is pretty simple. You first need to download the image from pfSense’s website (I used AMD64/DVD Image ISO Installer), flash the ISO into a USB stick, and boot your machine with it after plugging the WAN port to your Internet, and the LAN port to your computer (you will also need to plug the machine to a screen/keyboard, or to use the COM port).
The installation process will ask you various pretty standard things. If you’re using a Protectli machine, then you want to choose UEFI in the boot configuration. Once the installation is done, you can connect to the admin UI through your browser at the address https://192.168.1.1, and log in with the username admin and the password pfsense.
From there, you will go through a configuration screen asking you for various standard things again. I unchecked the Override DNS option and I did not fill DNS servers, because we will use a local resolver.
From there, you can unplug your computer from the device’s LAN port, plug in your access point instead, and connect through WiFi. Note that if you want to connect with SSH to your firewall, you will need to allow it from the System/Advanced/Secure Shell Menu.
Before continuing, let’s make a quick improvement: you might have noticed that the dashboard only has two columns available to order the widgets; so a big part of your screen is likely unused. Let’s go to System/General Setup, and change the Dashboard Columns value to 3 to not waste this space. Then, you can configure the dashboard however you like with new widgets (using the + on the top right of the dashboard’s page.)
Protectli Specific Configuration#
If you are using a Protectli device, the manufacturer advises doing a couple of changes in the configuration to take better advantage of the hardware (as detailed on this page.)
In System/Advanced/Miscellaneous:
- In
Power Savings, checkEnable PowerD, and put the three following fields asHiadaptive-> this will allow you to use theThermal Sensorswidget in the dashboard, and to see the temperature per CPU core - Set the
Cryptographic HardwareasAES-NI and BSD Crypto Device (aesni, cryptodev) - Set the
Thermal SensorsasIntel Core* CPI on-die thermal sensor
Note that you will probably see your CPU somewhere between 50 and 60 degrees Celsius when using the machine. This is expected and totally fine.
DNS Resolver#
We want to use our machine as a DNS resolver rather than use some DNS on the internet. Go to the Services/DNS Resolver Menu, and make sure that you have the following in the General Settings:
Enable DNS ResolvercheckedNetwork Interfaces->AllOutgoing Network Interfaces->All(note that we will change that when the VPN is set up, so all your VPN requests go through it)Struct Outgoing Network Interface BindinguncheckedEnable DNSSEC SupportcheckedEnable Python ModulecheckedEnable Forwarding Modeunchecked
We will also make sure that Query Name Minimization is checked in the Advanced Settings.
At this point, we have a functional network using our own VPN, and all clients connected to your access point will use it by default.
A Quick Note on DNS#
With the previous settings, we have our own DNS resolver. This means that if you try to connect to maps.google.com, the resolver will:
- Contact the root DNS to ask where to find the DNS in charge of the dot com TLD
- Contact the DNS in charge of the dot com TLD, and ask him where it can find google
- Contact google, and ask where it can find maps
Note that because Query Name Minimization is enabled, the resolver will send queries without including superfluous information. For example, when contacting the root DNS, it will ask where is the TLD in charge of dot com, but will not pass the entire maps.google.com that it is seeking to resolve. Similarly, when asking the TLD in charge of the dot com zone, it will ask for google.com and not maps.google.com. Using the resolver this way means that the DNS requests will be done unencrypted over port 53.
If you prefer to have the resolver only ask a DNS server for the result (in an encrypted manner), you can do the following:
- In
Services/DNS Resolver/General Settings, checkEnable Forwarding ModeandUse SSL/TLS for outgoing DNS Queries to Forwarding Servers - In
System/General Setup, fill a DNS server of your choice (preferably one that allows DNS over TLS,) for example Quad9 or Cloudflare - Still in the
General Setup, set theDNS Resolution Behaviorto only use the local DNS and ignore the remote ones (otherwise, you will potentially be subject to DNS leaks when using a VPN)
Both methods have pros and cons, and I don’t have a strong opinion on which is better.
Static DHCP Leases#
If you want all of your machines to use a VPN to connect to the Internet and to use pfBlockerNG, you can skip this step. Basically, we want to ensure that the machines connected to the network will always have the same IP address so that we can configure specific rules for them (i.e. you don’t need to do that for machines that you don’t want to set up special rules for.)
First, you will need to go to the Services/DHCP Server menu. If you used the default configuration, you probably have something like the following:

We will edit the range so that the IPs assigned by DHCP are from 192.168.1.100 to 192.168.1.245. This will allow us to manually assign an IP between 192.168.1.2 and 192.168.1.99 to our machines.
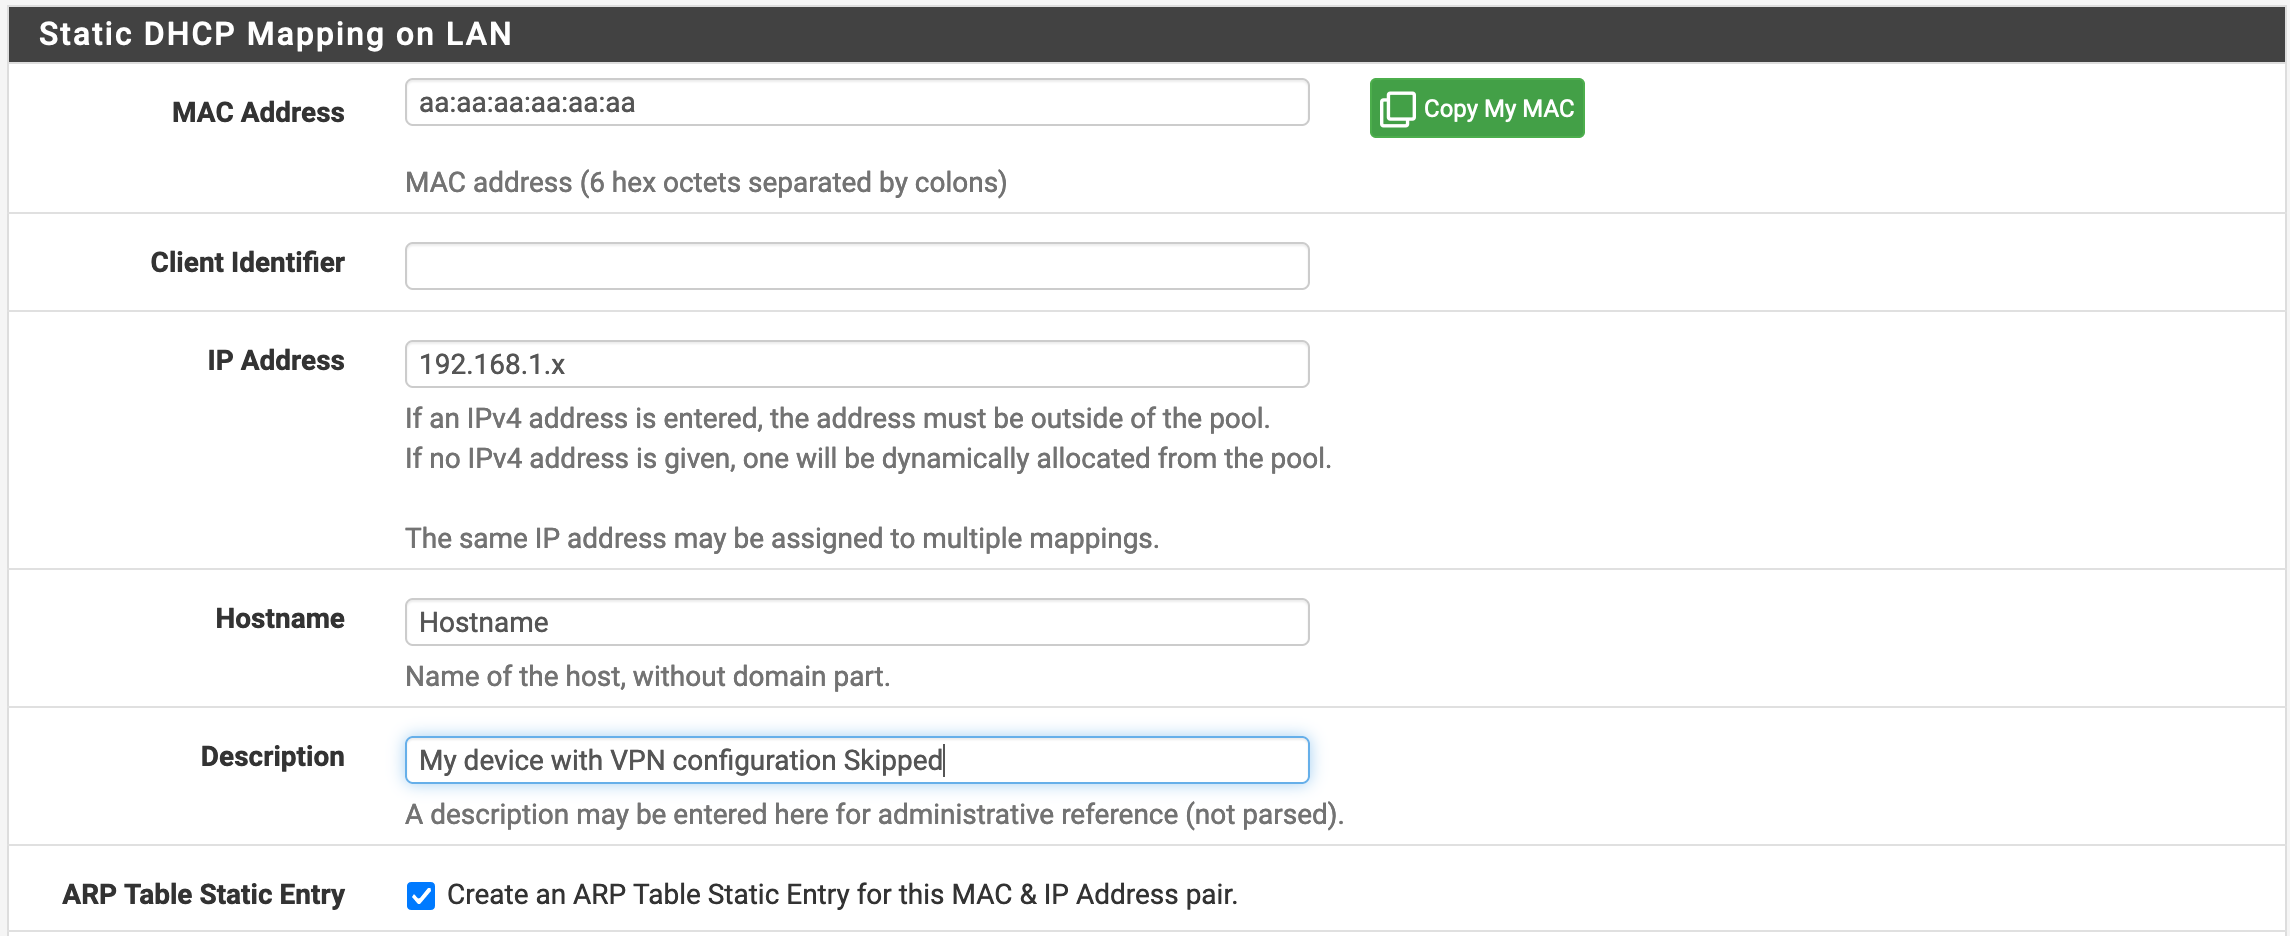
Then, at the bottom of the page, we will add an entry in DHCP Static Mapping for this Interface. Note that if your machines are already connected to the network, you can go to Status/DHCP Leases, and click on Add Static Mapping for the relevant entries, so that you won’t have to type the MAC Address and Hostname by yourself. You will then want to configure things as shown in the following screenshot. Note that sometimes, the UI will autofill the hostname with an IP address (mostly when it doesn’t know the hostname). This will make pfSense unhappy, so you don’t want to do that.
pfBlockerNG#
Everybody hates ads and tracking. Let’s do something about that too. pfBlockerNG is a module that can be installed in pfSense, and allows to do the same thing as a PiHole (not resolving DNS queries of known trackers/ads domain, plus quite a few other things.)
To install it, we will go to System/Package Manager/Available Packages, search for pfBlockerNG-devel, and then click on install. Note that there is also a pfBlockerNG version, but the devel one will give us more features.
The configuration can now be done in Firewall/pfBlockerNG.
General Menu#
In the general settings, we will check the Enable checkbox for pfBlockerNG, and leave the other settings by default. Note that the Log Settings allow you to define how many requests history you want to keep.
IP Menu#
This menu can be used for a variety of things such as preventing from connecting with IP addresses flagged as suspicious or identified in a certain geographical location, but we won’t look into that today.
If you want to have statistics about the location of the IPs resolved by the DNS server, you can get a free MaxMind License Key to use GeoIP, and record it in the appropriate menu.
DNSBL and Feeds Menu#
This is the feature that we will use to enable the DNS block list. You want to have the following configuration:
Enable DNSBLcheckedDNSBL Mode->Unbound python mode, which will allow better performances and more features (such as excluding specific IPs from the DNS blocking)DNS Reply Loggingchecked if you want to have statistics on what domain names are revolved (good to enable once in a while to do an audit of what is doing on with your machines)DNSBL BlockingcheckedHSTS ModecheckedPython Group Policyenabled, if you want to not use DNS filtering for some of your machines
If you have checked the Python Group Policy checkbox, a menu of the same name with a text box will be present on this page. You can add one IP per line, and these IPs will not use DNSBL.
Notice as well the DNSBL Whitelist section that will allow you to add domains that you don’t want to see locked.
DNSBL Groups#
In this submenu, we can configure groups of lists, and how much you want to have them refreshed. For example, if we configure DNSBL to use the EasyList, which is quite popular with AdBlockers, you should have something as follows.
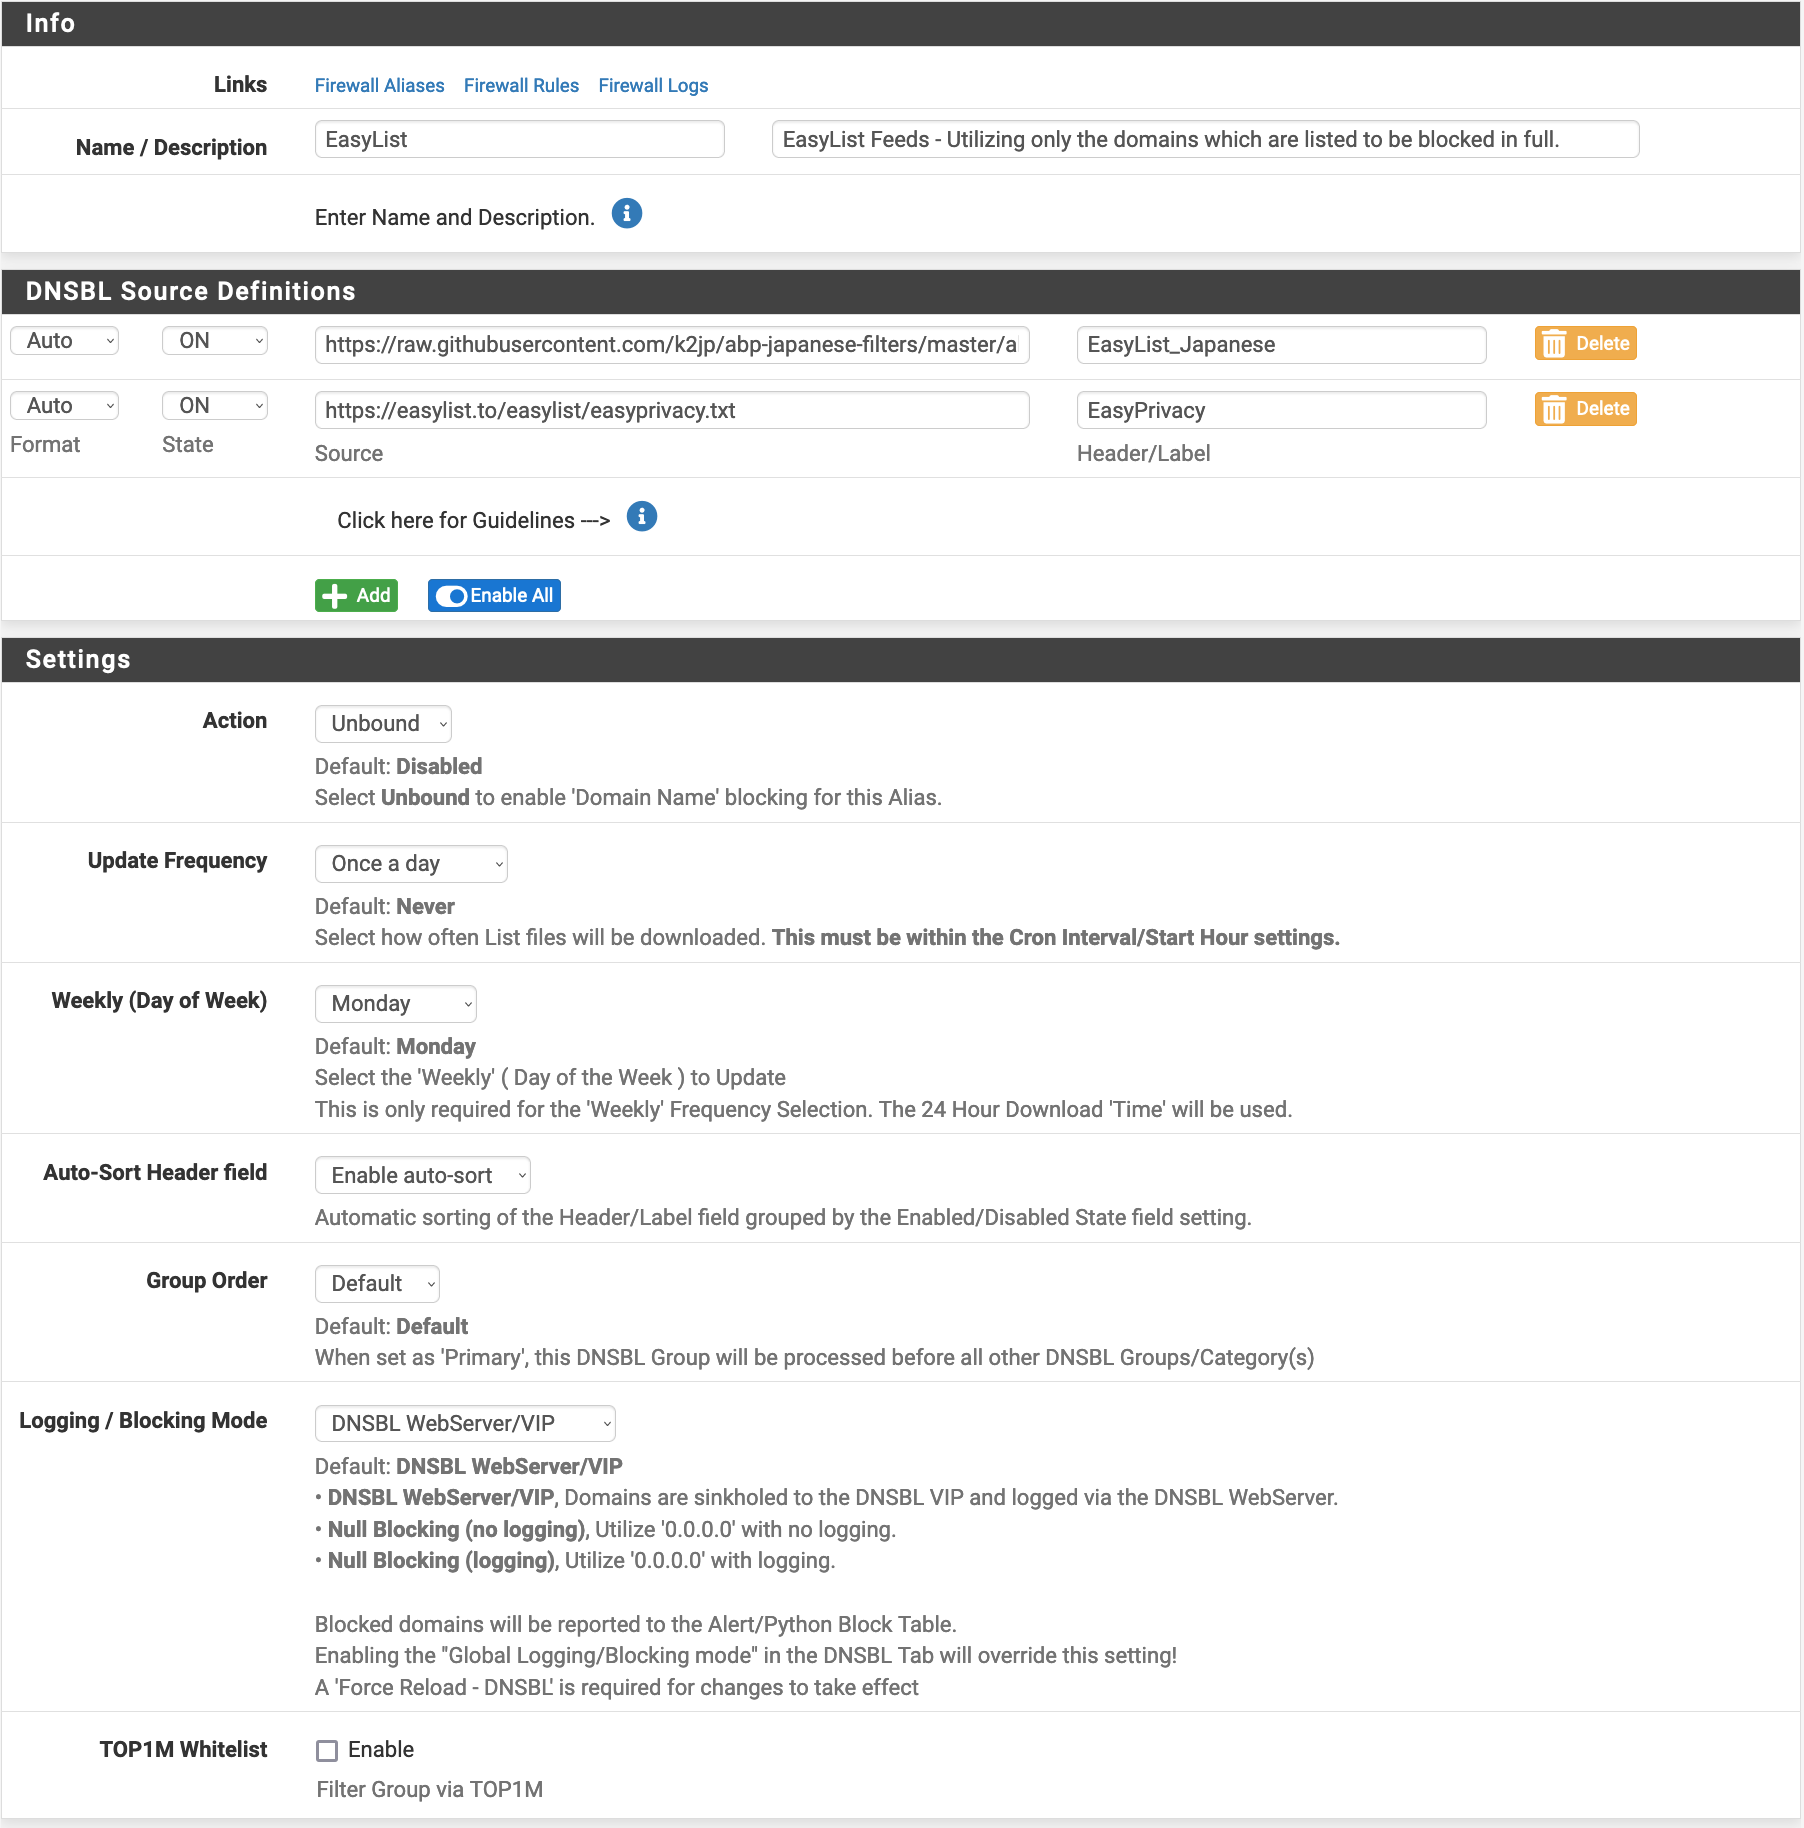
Note that you can change the Logging/Blocking mode to not keep track of the domains that are blocked. You can also set how often you want the lists to be updated.
If you want to create a group and add things manually, you can also do so by using the DNSBL Custom_List which allows you to list domain names.
I have no interest in censoring things from my network, but if you want to do so, you can use the DNSBL Category and DNSBL SafeSearch sub-menus to block things by category (e.g. porn, drugs, banking, hacking, gardening, … there is quite a large choice of filters…)
Feeds#
Adding groups and blocklists by hand is nice, but not too funny. Luckily, pBlockerNG comes with a set of lists that you can enable from the Feeds menu. You can just click on the + icon of the things of interest, and the software will pre-fill the DNSBL Groups form for you.
Reports#
Now that we finished the configuration, it is time to see some results. Before that (if it’s the first time you use the module,) be sure to go to the Update menu and to force a reload to have all the lists active.
Given you allowed things to be logged, you can use the following submenus:
Unifiedto see all of the activity related to the IP blocking and DNSBLAlertsto see the lists of things blockedDNS Replyto see the DNS queries that are madeDNS Reply Statsto see some graphs about your DNS activityDNSBL Block Statsto learn more about the blocked DNS queries
Note that how far in the past you can see is depending on how many lines you allow the logs to store.
VPN Configuration#
Now, let’s configure pfSense so that all of the connections to the Internet go through a VPN. I will not go into the specifics of setting up an instance of OpenVPN client because it will be slightly different depending on what provider you use. I’ve put links to the guides for Mullvad, ProtonVPN, and PIA in the references of this article. Since we will be using our own DNS, be careful not to configure any DNS with the OpenVPN connection (don’t check the Pull DNS option.)
Once your client is configured and is running properly, we will go to Interfaces/Interface Assignments and add an interface for the client. We then go into its configuration page, name it as VPN1 (or whatever pleases you), and check the Block bogon network box.
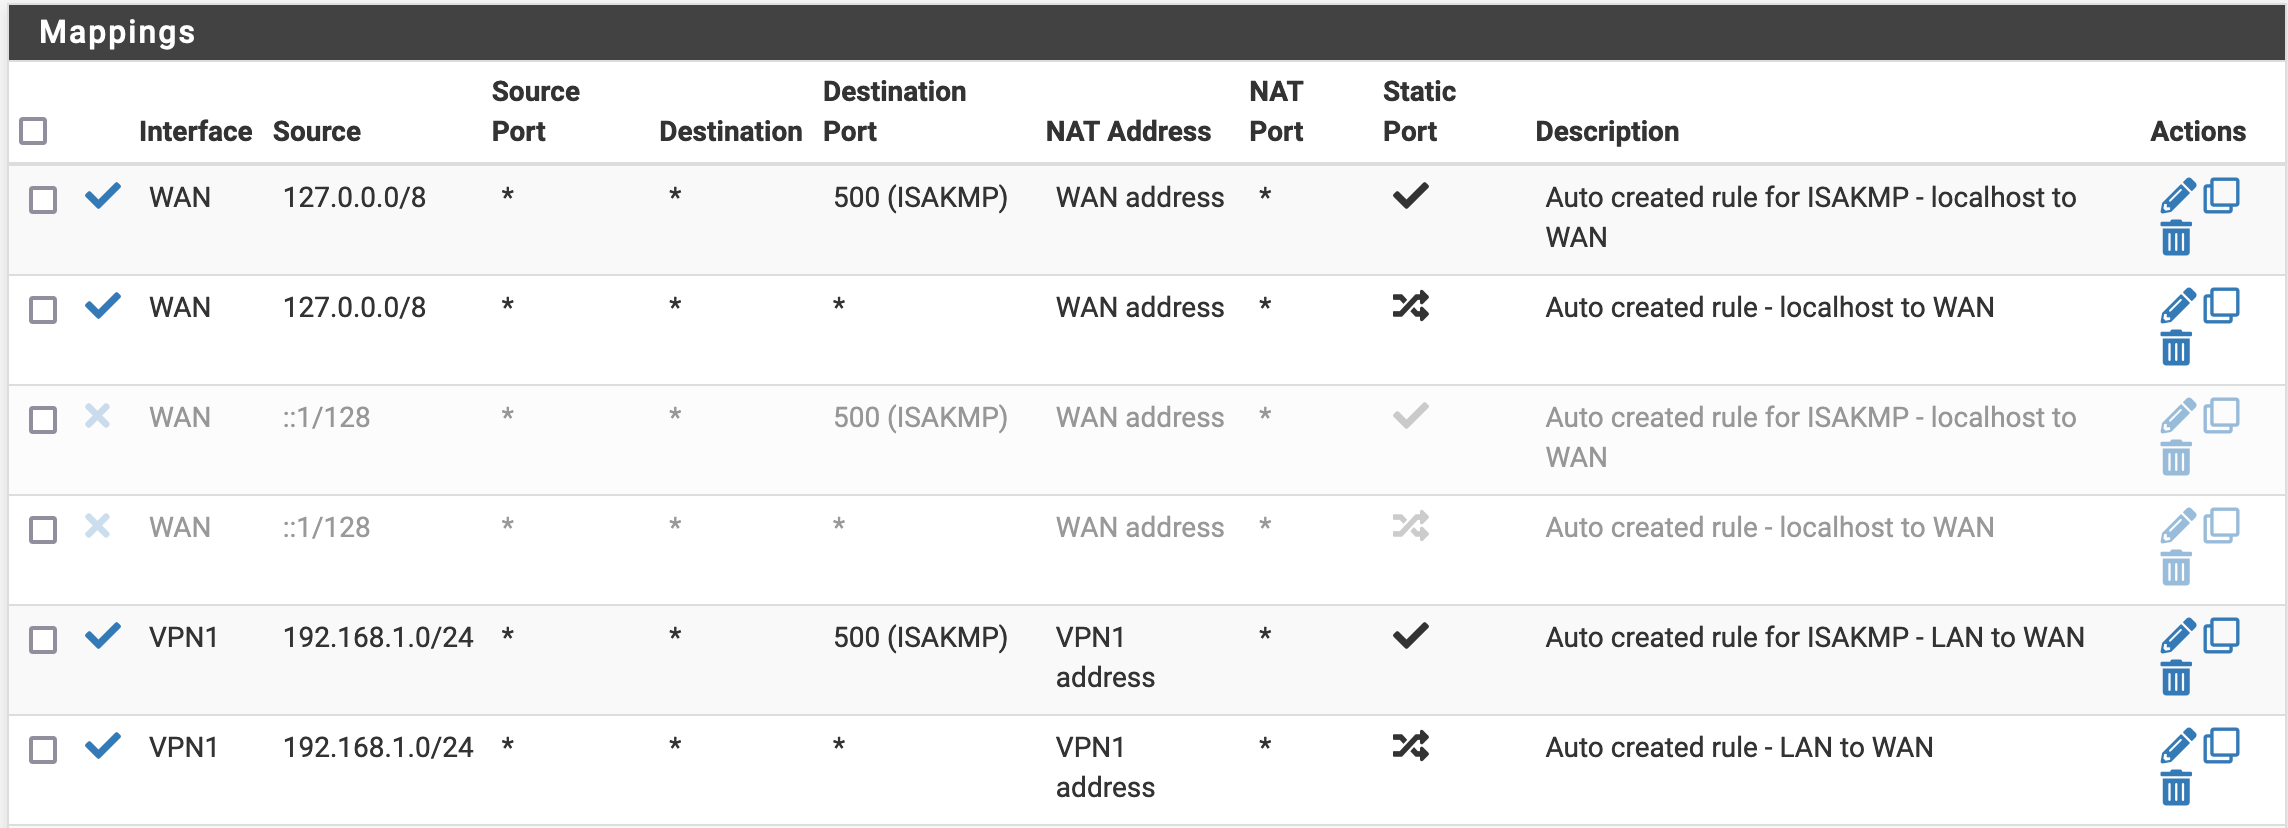
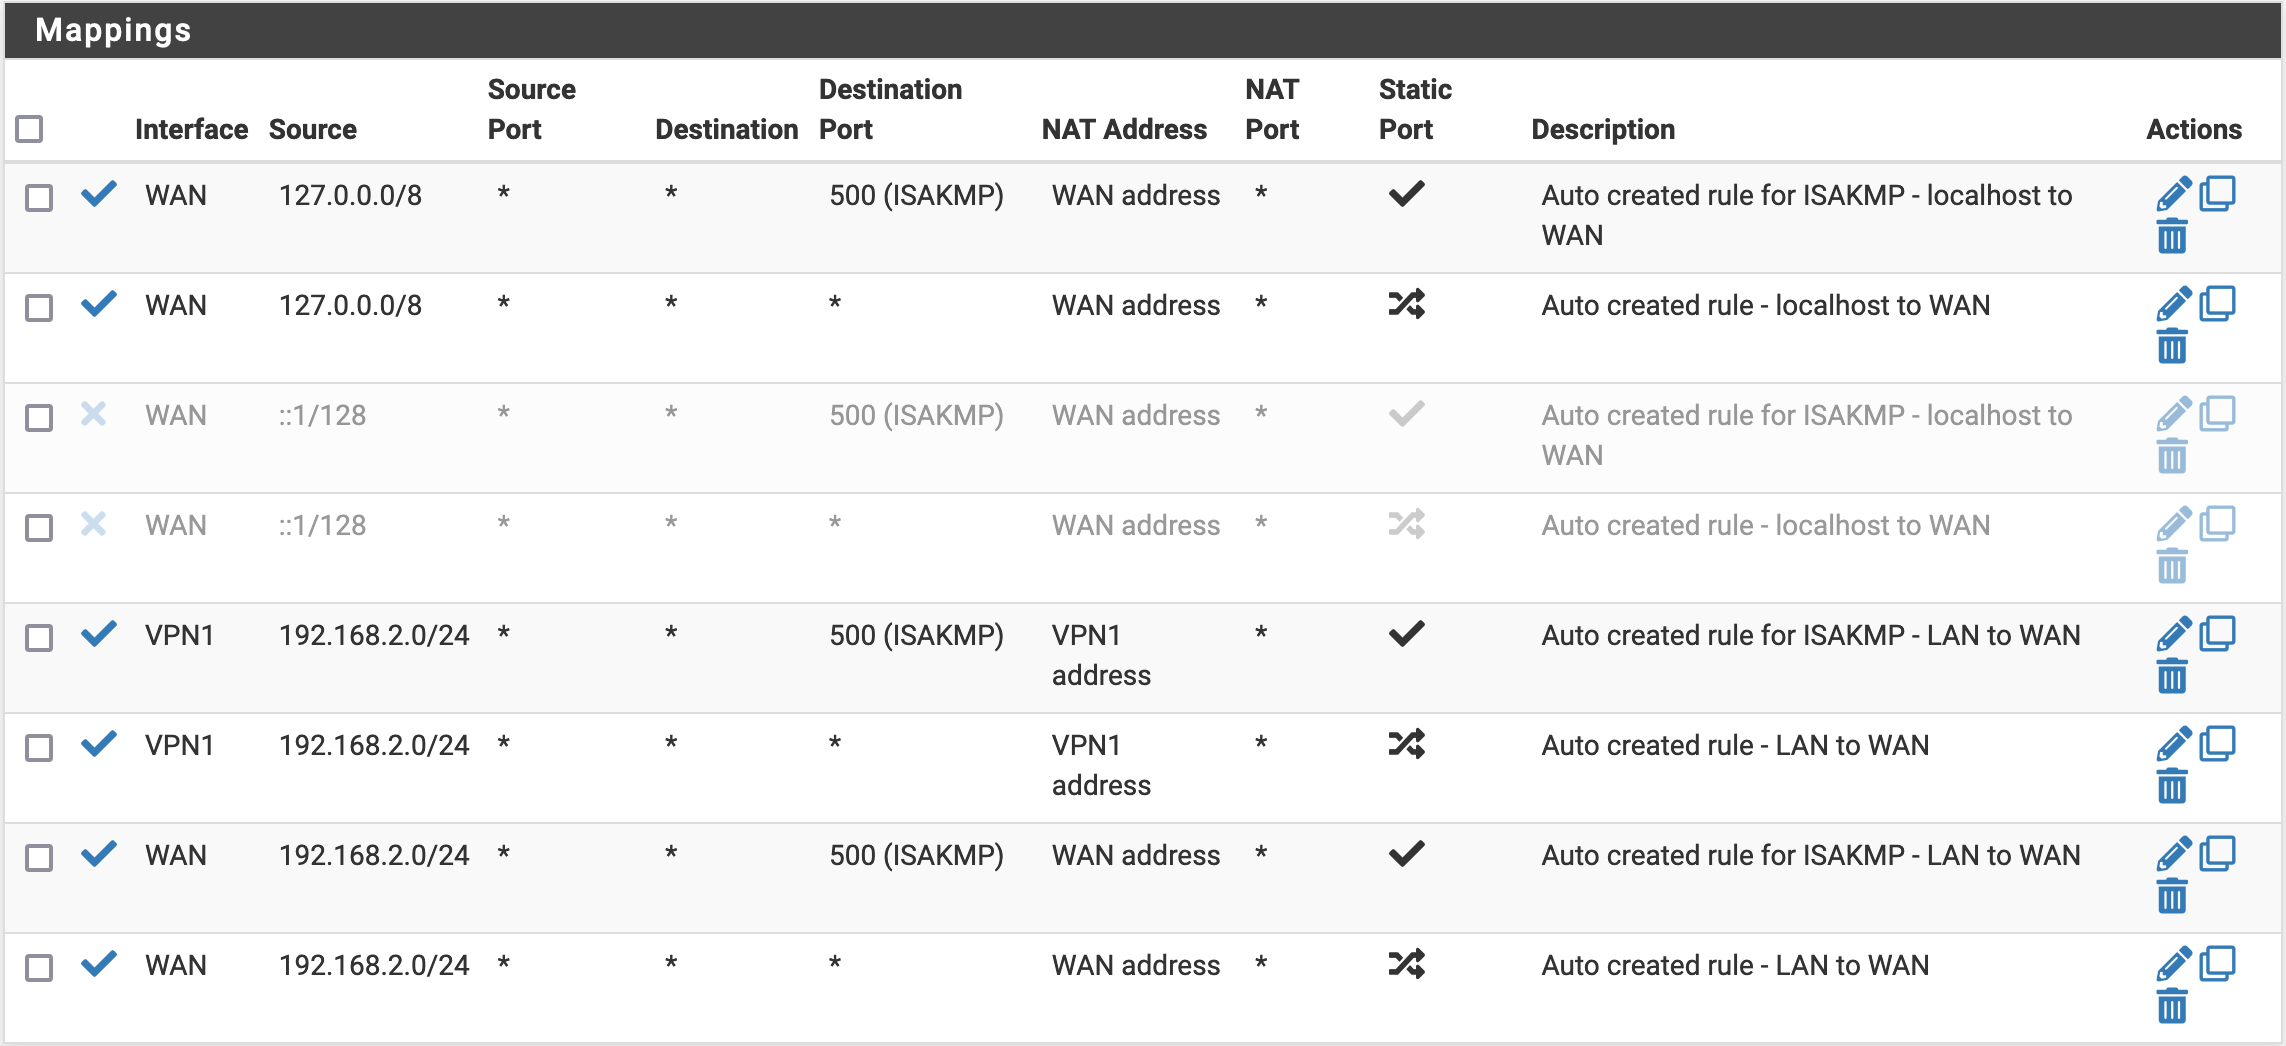
Then, we go to Firewall/NAT/Outbound, select the mode as Manual Outbound NAT rule generation, and save. New mappings should appear. We will change the two last rules (which should look like the following screenshot)

so that it looks as follows (you just have to change the Interface from WAN to VPN1, and to disable the IPv6 rules)
Then, in Firewall/Rules/LAN, we make sure to disable the IP v6 rules (icon on the right) and change the Default allow LAN to any rule rule to use our VPN1 interface as a gateway.

Finally, we want to make sure that our local DNS is sending its queries through the VPN connection. Go to Services/DNS Resolver, and change the Outgoing Network Interfaces so that only VPN1 is selected.
Restart the OpenVPN client, and you should be able to confirm that you have the correct IP. You can also do a DNS leak test to confirm that the DNS is not leaking (i.e. you should only see your VPN IP in the results.)
Exclude a Specific Device from the VPN#
If for some reason you want to have a device connecting to the Internet directly, we can allow that by configuring a couple of rules. First, we need to do some Firewall/NAT/Outbound configuration. We will actually make a copy of the rules we changed before, but this time put (back) WAN as an interface. In the end, you should have the following rules.
Then, for each device that you want to use without VPN, we will add a firewall rule in Firewall/Rules/LAN (you want to use Add rule to the top of the list, otherwise, it will not work.) You should change the following fields when creating a new rule:
- Source (
Single host or alias) -> The device’s IP (that you have configured as static using DHCP before) - Description -> Some memo for you
- Gateway -> the
WANinterface
Snort#
Finally, let’s add some security monitoring to our network and go to System/Package Manager/Available Packages, and install snort (an open-source Network Intrusion Detection and Prevention System.) Then, a new menu Services/Snort will appear. We will do the following configuration:
- In
Global Settings, enable the Rules that you are interested in, and set the update interval to 6 hours - In
Updates, click onUpdate Rules, and check that all is being downloaded properly
Once this is done, let’s create some Snort interfaces. One for LAN, and one for WAN. We do the following configuration:
- Enable the interfaces
- Check
Enable Packet Capturesto be able to see more context when we investigate an alert
There is also an option to Block Offenders triggering an alert. If you are configuring a home firewall, I advise that you don’t check that because you will likely end up getting a good chunk of false positives, and getting machines blocked for no good reasons.
With that, we have a working Snort, and we can add a widget to the home dashboard to see the latest alerts. I’m not going into a great level of detail on Snort now, because I plan to write an article on it later. I will link the article here when it is online.
Backup Your Configuration#
Now that we configured everything, let’s export a backup file so that we can restore everything in case of an issue. This is doable in the Diagnostics/Backup & Restore menu.
To Go Further#
If you want to learn more about the possibilities offered by PfSense, you might be interested in this article where I explain how to require a WireGuard connection to access your self-hosted services online, and how to configure PfSense to connect to WireGuard and route the traffic that needs to be.
Also, I recently wrote a new article with improvements that I came up with for this configuration (Home Network and pfSense Improvements). You might be interested in it if you want pfSense to be more bulletproof against the Internet being down in case of VPN failure, or if you want to make it easier to switch machines from using to not using the VPN.
References and Credits#
References#
- ProtonVPN pfSense configuration Guide
- Using pfSense with Mullvad
- pfSense 2.4.5 (OpenVPN Setup) (PIA)
- pfSense® CE Configuration Recommendations (Protectli)
- Cisco Umbrella DNS and QNAME Minimization
Credits#
- Cover photo by Jordan Harrison on Unsplash